jQuery如何實現(xiàn)彈出窗口-創(chuàng)新互聯(lián)
這篇文章主要介紹jQuery如何實現(xiàn)彈出窗口,文中介紹的非常詳細(xì),具有一定的參考價值,感興趣的小伙伴們一定要看完!

今天講了Jquery的彈出窗口的組成和用法:
先把引用文件的代碼寫好:
// 每個彈窗的標(biāo)識
var x =0;

var idzt = new Array();

var Window = function(config){

 //ID不重復(fù)
 idzt[x] = "zhuti"+x; //彈窗ID

 //初始化,接收參數(shù)
 this.config = {
  width : config.width || 300, //寬度
  height : config.height || 200, //高度
  buttons : config.buttons || '', //默認(rèn)無按鈕
  title : config.title || '標(biāo)題', //標(biāo)題
  content : config.content || '內(nèi)容', //內(nèi)容
  isMask : config.isMask == false?false:config.isMask || true, //是否遮罩
  isDrag : config.isDrag == false?false:config.isDrag || true, //是否移動
  };

 //加載彈出窗口
 var w = ($(window).width()-this.config.width)/2;
 var h = ($(window).height()-this.config.height)/2;

 var nr = "<div class='zhuti' id='"+idzt[x]+"' bs='"+x+"' style='width:"+this.config.width+"px; height:"+this.config.height+"px; background-color:white; left:"+w+"px; top:"+h+"px;'></div>";
 $("body").append(nr);

 //加載彈窗標(biāo)題
 var content ="<div id='title"+x+"' class='title' bs='"+x+"'>"+this.config.title+"<div id='close"+x+"' class='close' bs='"+x+"'>×</div></div>";
 //加載彈窗內(nèi)容
 var nrh = this.config.height - 75;
 content = content+"<div id='content"+x+"' bs='"+x+"' class='content' style='width:100%; height:"+nrh+"px;'>"+this.config.content+"</div>";
 //加載按鈕
 content = content+"<div id='btnx"+x+"' bs='"+x+"' class='btnx'>"+this.config.buttons+"</div>";

 //將標(biāo)題、內(nèi)容及按鈕添加進(jìn)窗口
 $('#'+idzt[x]).html(content);


 //創(chuàng)建遮罩層
 if(this.config.isMask)
 {
  var zz = "<div id='zz'></div>";
  $("body").append(zz);
  $("#zz").css('display','block');
 }

 //大最小限制,以免移動到頁面外
 var maxX = $(window).width()-this.config.width;
 var maxY = $(window).height()-this.config.height;
 var minX = 0,
  minY = 0;

 //窗口移動
 if(this.config.isDrag)
 {
  //鼠標(biāo)移動彈出窗
  $(".title").bind("mousedown",function(e){

    var n = $(this).attr("bs"); //取標(biāo)識

    //使選中的到最上層
    $(".zhuti").css("z-index",3);
    $('#'+idzt[n]).css("z-index",4);

    //取初始坐標(biāo)
    var endX = 0, //移動后X坐標(biāo)
     endY = 0, //移動后Y坐標(biāo)
     startX = parseInt($('#'+idzt[n]).css("left")), //彈出層的初始X坐標(biāo)
     startY = parseInt($('#'+idzt[n]).css("top")), //彈出層的初始Y坐標(biāo)
     downX = e.clientX, //鼠標(biāo)按下時,鼠標(biāo)的X坐標(biāo)
     downY = e.clientY; //鼠標(biāo)按下時,鼠標(biāo)的Y坐標(biāo)

    //綁定鼠標(biāo)移動事件
    $("body").bind("mousemove",function(es){

     endX = es.clientX - downX + startX; //X坐標(biāo)移動
     endY = es.clientY - downY + startY; //Y坐標(biāo)移動

     //大最小限制
     if(endX > maxX)
     {
      endX = maxX;
     } else if(endX < 0)
     {
      endX = 0;
     }
     if(endY > maxY)
     {
      endY = maxY;
     } else if(endY < 0)
     {
      endY = 0;
     }

     $('#'+idzt[n]).css("top",endY+"px");
     $('#'+idzt[n]).css("left",endX+"px");

     window.getSelection ? window.getSelection().removeAllRanges():document.selection.empty(); //取消選中文本

     });
   });
  //鼠標(biāo)按鍵抬起,釋放移動事件
  $("body").bind("mouseup",function(){

    $("body").unbind("mousemove");

   });
 }

 //關(guān)閉窗口
 $(".close").click(function(){

   var m = this.getAttribute("bs"); //找標(biāo)識
   $('#'+idzt[m]).remove(); //移除彈窗
   $('#zz').remove(); //移除遮罩

  })

  x++; //標(biāo)識增加

}
這個JS文件把彈出窗口的內(nèi)容,樣式,位置,按鈕,以及遮罩層都做了處理,在引用前好好看看里面的代碼,最好都能弄懂,里面也做了詳細(xì)的注釋,希望可以幫的你。
下面是CSS樣式表:
.zhuti
{
 position:absolute;
 z-index:3;
 font-size:14px;
 border-radius:5px;
 box-shadow:0 0 5px white;
 overflow:hidden;
 color:#333;
}
.title
{
 background-color:#3498db;
 vertical-align:middle;
 height:35px;
 width:100%;
 line-height:35px;
 text-indent:1em;
}
.close{
 float:right;
 width:35px;
 height:35px;
 font-weight:bold;
 line-height:35px;
 vertical-align:middle;
 color:white;
 font-size:18px;
 }
.close:hover
{
 cursor:pointer;
}
.content
{
 text-indent:1em;
 padding-top:10px;
}
.btnx
{
 height:30px;
 width:100%;
 text-indent:1em;
}
.btn
{
 height:28px;
 width:80px;
 float:left;
 margin-left:20px;
 color:#333;
}
#zz
{
 width:100%;
 height:100%;
 opacity:0.15;
 display:none;
 background-color:#ccc;
 z-index:2;
 position:absolute;
 top:0px;
 left:0px;
}
這個樣式表把每個標(biāo)簽和所需要的樣式都寫好了,這樣就能節(jié)省主要頁面的代碼量,并且讓主頁面看起來非常的整齊,如果要改,只需要在CSS樣式表中修改即可,注意:不管要引用什么文件,必須把Jquery文件放在最前面!!!
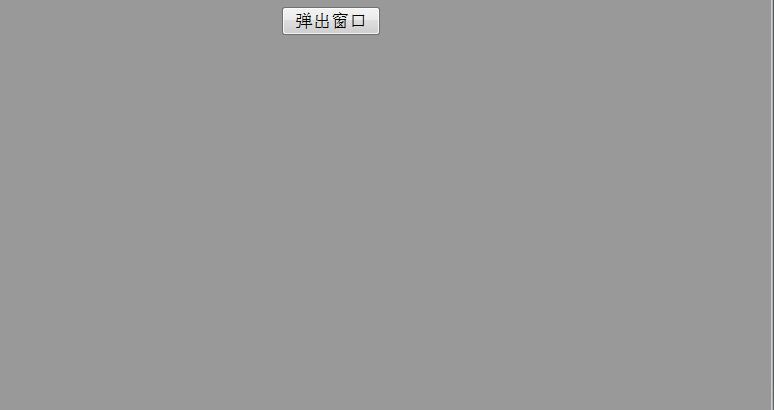
下面是主頁面代碼:
<!DOCTYPE html PUBLIC "-//W3C//DTD XHTML 1.0 Transitional//EN" "http://www.w3.org/TR/xhtml1/DTD/xhtml1-transitional.dtd">
<html xmlns="http://www.w3.org/1999/xhtml">
<head>
<meta http-equiv="Content-Type" content="text/html; charset=utf-8" />
<title>無標(biāo)題文檔</title>
<script type="text/javascript" src="jquery-1.11.2.min.js">
</script>
<script type="text/javascript" src="tanchuang.js">
</script>
<link href="tanchuang.css" rel="external nofollow" rel="stylesheet" type="text/css" />
<style type="text/css">
*{
margin: 0px auto;
}
</style>
</head>
<body >
<div >
<input type="button" value="彈出窗口" id="btntc" />
</div>
</body>
<script type="text/javascript">
$(document).ready(function(e) {
$('#btntc').click(function(){
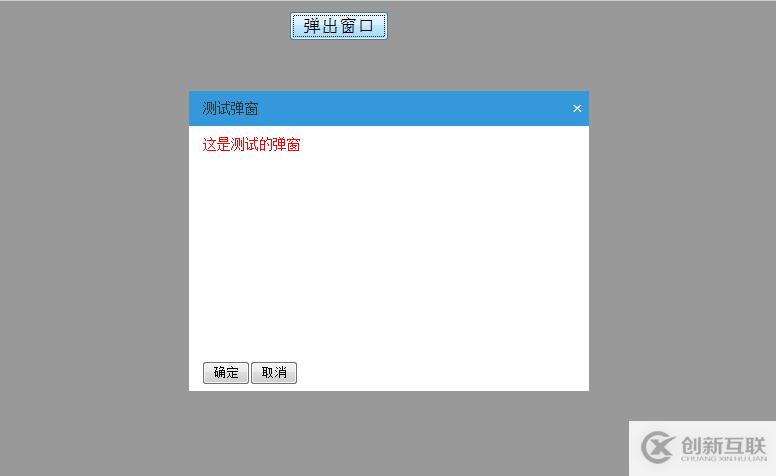
var html = "<div style='color:red'>這是測試的彈窗</div>";
var button ="<input type='button' value='確定' /><input type='button' value='取消' />";
var win = new Window({
width : 400, //寬度
height : 300, //高度
title : '測試彈窗', //標(biāo)題
content : html, //內(nèi)容
isMask : false, //是否遮罩
buttons : button, //按鈕
isDrag:true, //是否移動
});
})
});
</script>
</html>同樣的,主頁面里面也加了詳細(xì)的注釋,這樣便于日后的理解,希望可以幫的自己和大家。讓我們看看效果吧:
點(diǎn)擊彈出窗口之后的效果:
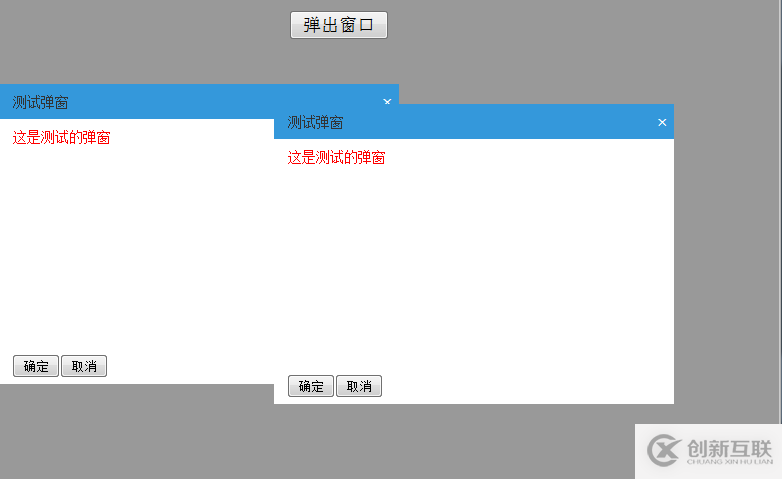
我們可以看到每個彈出窗口都可以移動,并且可以彈出無數(shù)個窗口,如果把遮罩層改成true,那樣就不能再出現(xiàn)第二個彈出窗口了。
一定要記住遮罩層的實用,這樣可以避免很多BUG如果要引用彈出窗口一定要測試好了再使用,以防出現(xiàn)問題,切記!
以上是“jQuery如何實現(xiàn)彈出窗口”這篇文章的所有內(nèi)容,感謝各位的閱讀!希望分享的內(nèi)容對大家有幫助,更多相關(guān)知識,歡迎關(guān)注創(chuàng)新互聯(lián)網(wǎng)站建設(shè)公司行業(yè)資訊頻道!
另外有需要云服務(wù)器可以了解下創(chuàng)新互聯(lián)建站chinadenli.net,海內(nèi)外云服務(wù)器15元起步,三天無理由+7*72小時售后在線,公司持有idc許可證,提供“云服務(wù)器、裸金屬服務(wù)器、高防服務(wù)器、香港服務(wù)器、美國服務(wù)器、虛擬主機(jī)、免備案服務(wù)器”等云主機(jī)租用服務(wù)以及企業(yè)上云的綜合解決方案,具有“安全穩(wěn)定、簡單易用、服務(wù)可用性高、性價比高”等特點(diǎn)與優(yōu)勢,專為企業(yè)上云打造定制,能夠滿足用戶豐富、多元化的應(yīng)用場景需求。
本文標(biāo)題:jQuery如何實現(xiàn)彈出窗口-創(chuàng)新互聯(lián)
鏈接分享:http://chinadenli.net/article12/hcsdc.html
成都網(wǎng)站建設(shè)公司_創(chuàng)新互聯(lián),為您提供營銷型網(wǎng)站建設(shè)、全網(wǎng)營銷推廣、企業(yè)網(wǎng)站制作、云服務(wù)器、用戶體驗、網(wǎng)站制作
聲明:本網(wǎng)站發(fā)布的內(nèi)容(圖片、視頻和文字)以用戶投稿、用戶轉(zhuǎn)載內(nèi)容為主,如果涉及侵權(quán)請盡快告知,我們將會在第一時間刪除。文章觀點(diǎn)不代表本網(wǎng)站立場,如需處理請聯(lián)系客服。電話:028-86922220;郵箱:631063699@qq.com。內(nèi)容未經(jīng)允許不得轉(zhuǎn)載,或轉(zhuǎn)載時需注明來源: 創(chuàng)新互聯(lián)
猜你還喜歡下面的內(nèi)容
- C++如何讀取WAV音頻文件的頭部數(shù)據(jù)-創(chuàng)新互聯(lián)
- 怎么在php中使用遞歸獲取目錄內(nèi)的文件-創(chuàng)新互聯(lián)
- php中將整型轉(zhuǎn)化為字符串類型的方法-創(chuàng)新互聯(lián)
- js之鼠標(biāo)跟隨jquery版的示例分析-創(chuàng)新互聯(lián)
- 成功,要“借力”,不要“盡力”-創(chuàng)新互聯(lián)
- 杭電OJ2028最小的公倍數(shù)之和C語言版-創(chuàng)新互聯(lián)
- DevOps環(huán)境從零搭建(一)-創(chuàng)新互聯(lián)

- 外貿(mào)網(wǎng)站建設(shè)小細(xì)節(jié)! 2013-08-22
- 實驗分析儀器-外貿(mào)網(wǎng)站建設(shè)-產(chǎn)品描述作用重大! 2016-03-17
- 成都網(wǎng)站建設(shè)-如何挑選營銷型外貿(mào)網(wǎng)站建設(shè)公司? 2016-10-08
- 學(xué)校網(wǎng)站跟企業(yè)網(wǎng)站建設(shè)有什么不同 2022-05-21
- 浙江網(wǎng)站設(shè)計-浙江外貿(mào)網(wǎng)站建設(shè)設(shè)計制作方案 2021-10-26
- 外貿(mào)網(wǎng)站建設(shè)需要多少錢 2022-10-28
- 外貿(mào)網(wǎng)站建設(shè)使用模板站弊端有哪些 2016-03-22
- 外貿(mào)網(wǎng)站建設(shè)的幾個基本原則 2022-07-10
- 佛山外貿(mào)網(wǎng)站建設(shè)的注意事項 2022-11-21
- 外貿(mào)網(wǎng)站建設(shè),價值才是制勝法寶 2016-11-14
- 外貿(mào)網(wǎng)站建設(shè)我們需要注意什么呢? 2022-06-17
- 外貿(mào)網(wǎng)站建設(shè)應(yīng)該注意哪些功能的設(shè)計 2013-07-15