Linux怎么安裝Oracle11g-創(chuàng)新互聯(lián)
這篇文章主要講解了“Linux怎么安裝Oracle 11g”,文中的講解內(nèi)容簡(jiǎn)單清晰,易于學(xué)習(xí)與理解,下面請(qǐng)大家跟著小編的思路慢慢深入,一起來(lái)研究和學(xué)習(xí)“Linux怎么安裝Oracle 11g”吧!

安裝前環(huán)境準(zhǔn)備
安裝所需要的軟件包:
yum install binutils compat-libcap1 compat-libstdc++ gcc gcc-c++ glibc glibc-devel \ ksh libaio libaio-devel libgcc libstdc++ libstdc++-devel libXi libXtst make \ sysstat unixODBC-devel -yyum install binutils* compat-libcap1* compat-libstdc++* gcc gcc-c++ glibc glibc-devel* ksh libaio* libaio-devel libgcc libstdc++* libstdc++-devel libXi* libXtst make sysstat* unixODBC-devel -y創(chuàng)建用戶組和用戶:
groupadd -g 502 dba groupadd oinstall groupadd -g 504 asmadmin groupadd -g 506 asmdba useradd -u 502 -g oinstall -G dba,asmdba oracle設(shè)置用戶密碼:
passwd oracle修改內(nèi)核資源限制,在/etc/security/limits.conf添加如下內(nèi)容:
* soft nofile 4096 * hard nofile 65536 oracle soft nproc 2047 oracle hard nproc 16384 oracle soft nofile 1024 oracle hard nofile 65536在文件/etc/pam.d/login文件中增加一行,配置驗(yàn)證登錄限制:
session required pam_limits.so修改內(nèi)核參數(shù),在/etc/sysctl.conf文件中增加如下內(nèi)容:
fs.aio-max-nr = 1048576 fs.file-max = 6815744 kernel.shmall = 2097152 kernel.shmmax = 536870912 kernel.shmmni = 4096 kernel.sem = 250 32000 100 128 net.ipv4.ip_local_port_range = 9000 65500 net.core.rmem_default = 262144 net.core.rmem_max = 4194304 net.core.wmem_default = 262144 net.core.wmem_max = 1048576 net.ipv4.tcp_wmem = 262144 262144 262144 net.ipv4.tcp_wmem = 4194304 4194304 4194304設(shè)置使生效:
sysctl -p創(chuàng)建Oracle base目錄:
mkdir -p /data/app/oracle chown -R oracle:oinstall /data/app/oracle chmod -R 775 /data/app/oracle創(chuàng)建數(shù)據(jù)庫(kù)文件目錄和快速恢復(fù)區(qū)目錄:
數(shù)據(jù)文件目錄
mkdir /data/app/oracle/oradata chown oracle:oinstall /data/app/oracle/oradata chmod 775 /data/app/oracle/oradata/快速恢復(fù)區(qū)文件目錄
mkdir /data/app/oracle/recovery_area chown oracle:oinstall /data/app/oracle/recovery_area/ chmod 775 /data/app/oracle/recovery_area安裝庫(kù)軟件
從官網(wǎng)下載Oracle11g,是兩個(gè)zip壓縮文件,下載后在同一個(gè)目錄中解壓這兩個(gè)文件,會(huì)生成一個(gè)database的目錄。這里使用圖形安裝的方式,需要在本地配置Xserver,Windows客戶端具體配置方式參考此鏈接:http://tryingstuff.blog.51cto.com/4603492/1958772
切換到oracle用戶,添加環(huán)境變量:
export ORACLE_BASE=/data/app/oracle
配置X:
export DISPLAY=192.168.20.171:0.0
xhost +
access control disabled, clients can connect from any host
執(zhí)行如下命令進(jìn)行安裝:
# cd database/ # ./runInstaller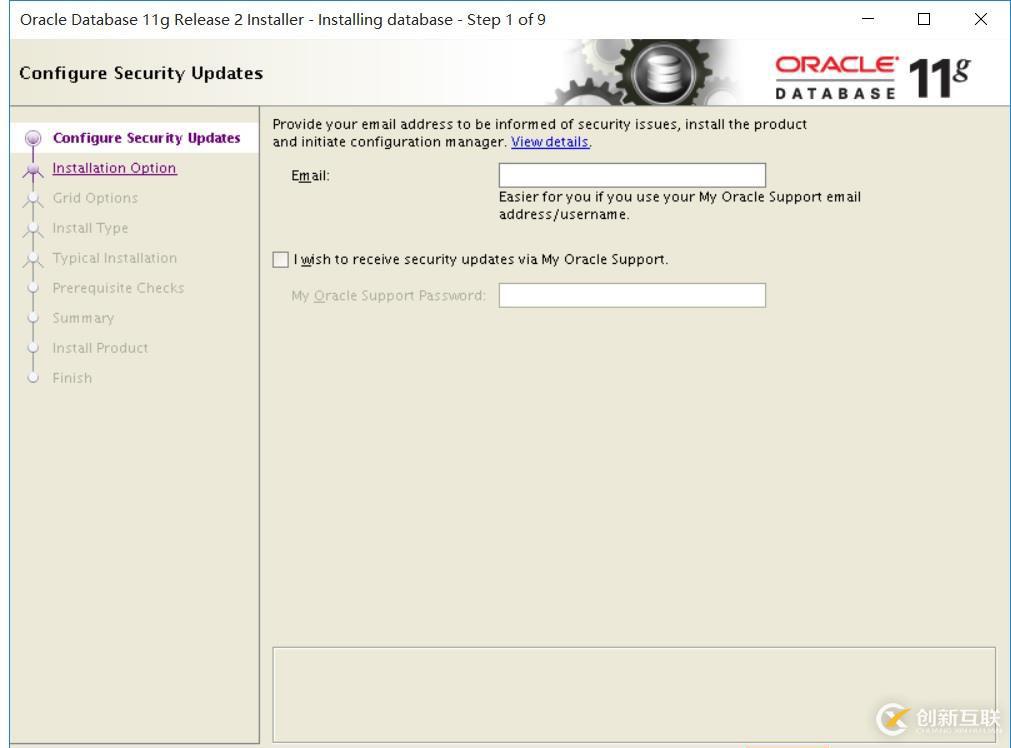
這里可以選擇先安裝應(yīng)用再創(chuàng)建數(shù)據(jù)庫(kù),也可以一次性創(chuàng)建數(shù)據(jù)庫(kù),這里先進(jìn)行安裝:
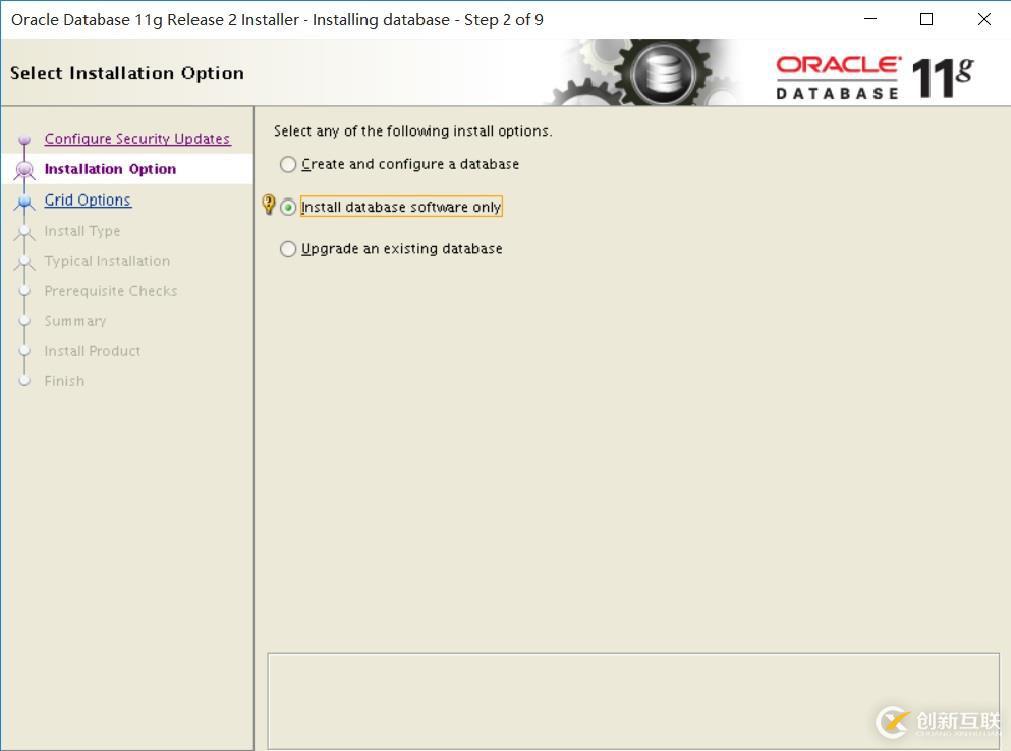
選擇單實(shí)例,和企業(yè)版本后,會(huì)根據(jù)我們添加的環(huán)境變量,找到對(duì)應(yīng)的安裝目錄:

如果安裝中出現(xiàn)此錯(cuò)誤,需要修改目錄權(quán)限:
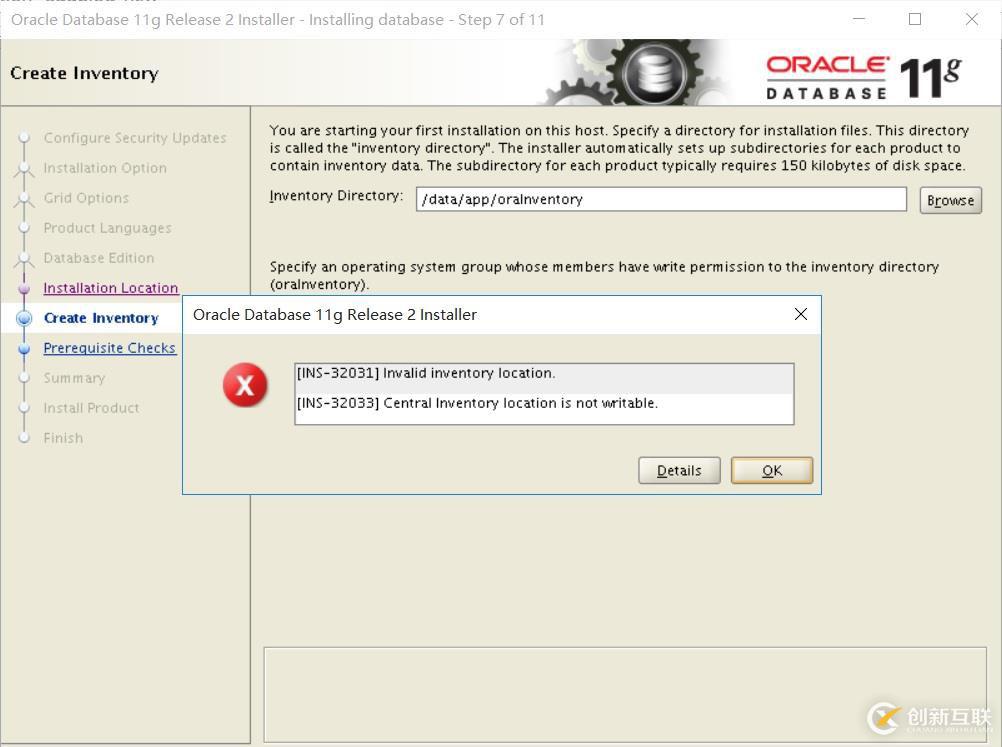
chown -R oracle:oinstall /data/app
修改權(quán)限即可。
如果安裝的軟件包不符合要求會(huì)出現(xiàn)如下提示,可以通過下載這些軟件包,強(qiáng)制安裝。
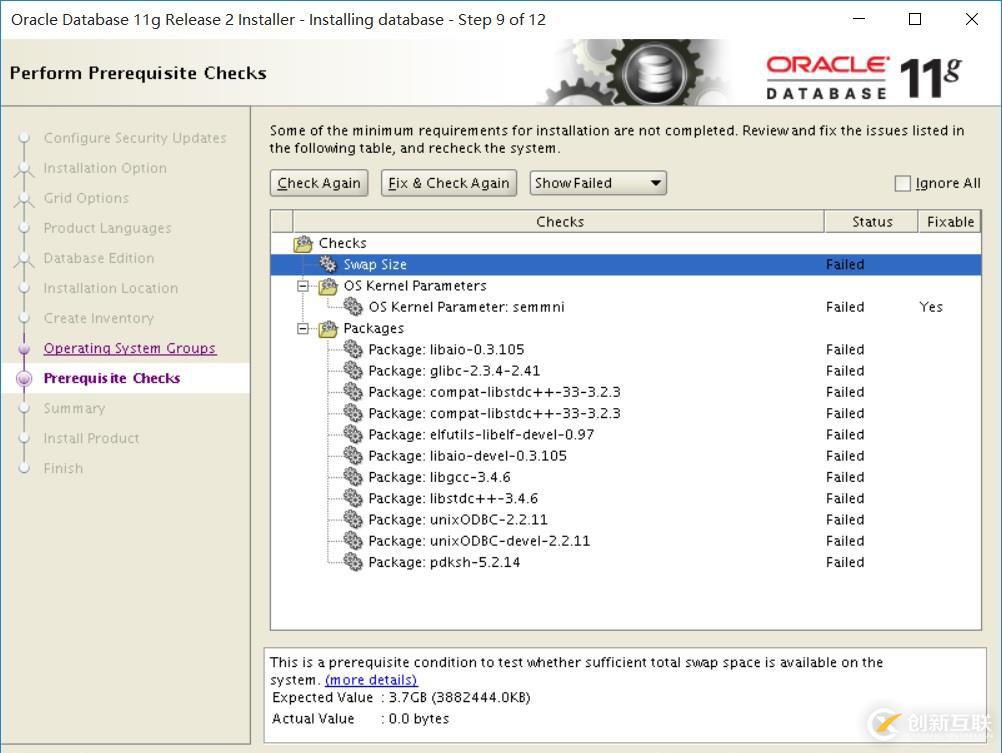
逐以安裝缺失的軟件包,可以在這里下載缺失的軟件包:http://down.51cto.com/data/2339840
如果要解決依賴關(guān)系可以使用如下命令強(qiáng)制安裝:
rpm -ivh --nodeps --force packagename.rpm如果出現(xiàn)此錯(cuò)誤,可以先忽略:
PRVF-7543 : OS Kernel parameter “semmni” does not have proper value on node “hostname” [Expected = “128” ; Found = “0”]. – Cause: Kernel parameter value does not meet the requirement. – Action: Modify the kernel parameter value to meet the requirement.
一般在Link binaries這一步出現(xiàn)錯(cuò)誤是,大多數(shù)情況是由于部分系統(tǒng)包沒有安裝成功,需要重新安裝所需的包,可以使用如下腳本檢測(cè)軟件包是否裝好:
#!/bin/sh count=0 arr=( binutils-2* compat-libstdc++-33* elfutils-libelf-0.* elfutils-libelf-devel-0.* elfutils-libelf-devel-static-0.* gcc-4.* gcc-c++-4* glibc-2.* glibc-common-2.* glibc-devel-2.* glibc-headers-2* kernel-headers-* ksh-* libaio-0.* libaio-devel-0.* libgcc-4.* libgomp-4.* libstdc++-4.* libstdc++-devel-* make-* numactl-devel-* sysstat-* ) len=${#arr[@]} for((i=0;i<len;i++)); do char=${arr[$i]} rpm -qa | grep "^$char" if [ $? != 0 ] ; then error[$count]=${arr[$i]} count=$(($count+1)) echo "+++++++++++++++the ${arr[$i]}^is not installed++++++++++++++++++" fi done if [ $count -lt "0" ];then echo "You have $count patchs are not installed." echo "the not installed patch is:" len1=${#error[@]} for((ii=0;ii<len1;ii++)); do echo "${error[$ii]}^" done echo -e "Are you sure to install the patch[yes or no]:\c" read select if [ $select == "yes" ]; then for((is=0;is<len1;is++)); do var=${error[$is]} rpm -ivh ./patch/$var.rpm done fi else echo "++++++++++++++++++++++CHECK PASS!+++++++++++++++++++++++++++" fi count=0 rpm -q binutils compat-libstdc++-33 elfutils-libelf elfutils-libelf-devel expat gcc gcc-c++ glibc glibc-common glibc-devel glibc-headers libaio libaio-devel libgcc libstdc++ libstdc++-devel make pdksh sysstat unixODBC unixODBC-devel | grep "not installed"繼續(xù)點(diǎn)擊下一步,直到安裝完成.
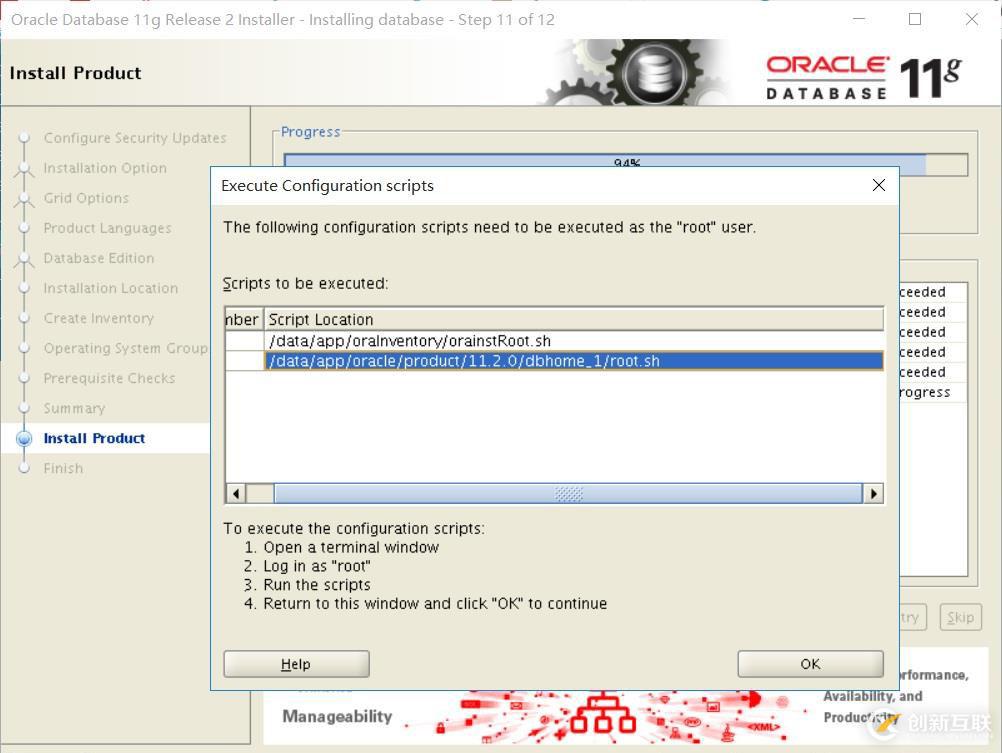
安裝完成后,按照提示使用root 執(zhí)行系統(tǒng)給出的腳本:
添加oracle的環(huán)境變量:
在oracle用戶下修改.bash_profile:
export ORACLE_BASE=/data/app/oracle export ORACLE_HOME=/data/app/oracle/product/11.2.0/dbhome_1 PATH=$PATH:$HOME/.local/bin:$HOME/bin:$ORACLE_HOME/bin到此為止,Orace 數(shù)據(jù)庫(kù)的軟件安裝工作就完成了。
啟動(dòng)監(jiān)聽
在oracle 用戶下使用netca命令啟動(dòng)監(jiān)聽配置界面:
[oracle@temp-test ~]$ export DISPLAY=192.168.20.171:0.0 [oracle@temp-test ~]$ xhost + access control disabled, clients can connect from any host [oracle@temp-test ~]$ netca Oracle Net Services Configuration:
然后都是用默認(rèn)配置,監(jiān)聽1521端口。
$ netstat -lntp|grep 1521 tcp6 0 0 :::1521 :::* LISTEN 22939/tnslsnr顯示監(jiān)聽狀態(tài):
[oracle@temp-test ~]$ lsnrctl status LSNRCTL for Linux: Version 11.2.0.1.0 - Production on 02-NOV-2017 18:27:02 Copyright (c) 1991, 2009, Oracle. All rights reserved. Connecting to (DESCRIPTION=(ADDRESS=(PROTOCOL=TCP)(HOST=temp-test)(PORT=1521))) STATUS of the LISTENER ------------------------ Alias LISTENER Version TNSLSNR for Linux: Version 11.2.0.1.0 - Production Start Date 02-NOV-2017 18:20:27 Uptime 0 days 0 hr. 6 min. 38 sec Trace Level off Security ON: Local OS Authentication SNMP OFF Listener Parameter File /data/app/oracle/product/11.2.0/dbhome_1/network/admin/listener.ora Listener Log File /data/app/oracle/diag/tnslsnr/temp-test/listener/alert/log.xml Listening Endpoints Summary... (DESCRIPTION=(ADDRESS=(PROTOCOL=tcp)(HOST=temp-test)(PORT=1521))) The listener supports no services The command completed successfully使用DBCA工具創(chuàng)建數(shù)據(jù)庫(kù)
dbca是數(shù)據(jù)庫(kù)自帶的數(shù)據(jù)庫(kù)配置助手,可以幫助我們方便的創(chuàng)建數(shù)據(jù)庫(kù),刪除數(shù)據(jù)庫(kù),配置數(shù)據(jù)庫(kù)。
執(zhí)行dbca命令:
[oracle@temp-test ~]$ dbca
選擇創(chuàng)建數(shù)據(jù)庫(kù),選擇數(shù)據(jù)庫(kù)類型:

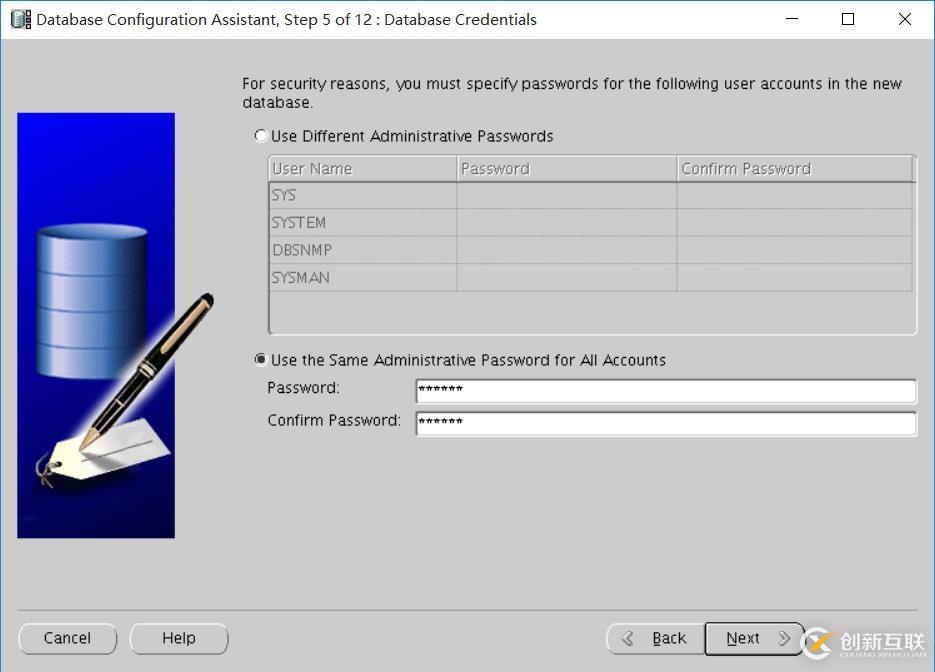
設(shè)置數(shù)據(jù)庫(kù)的名稱和SID為 “orcl”, 設(shè)置所有數(shù)據(jù)庫(kù)使用相同的密碼,這里設(shè)置的密碼要滿足密碼復(fù)雜度的要求:
選擇數(shù)據(jù)存放目錄:

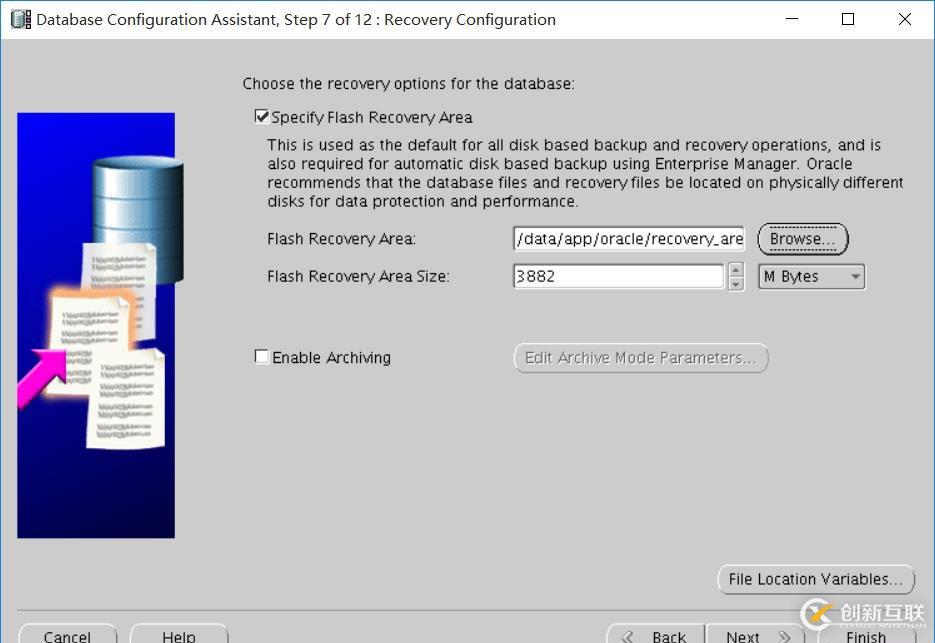
選擇閃回恢復(fù)區(qū)目錄:
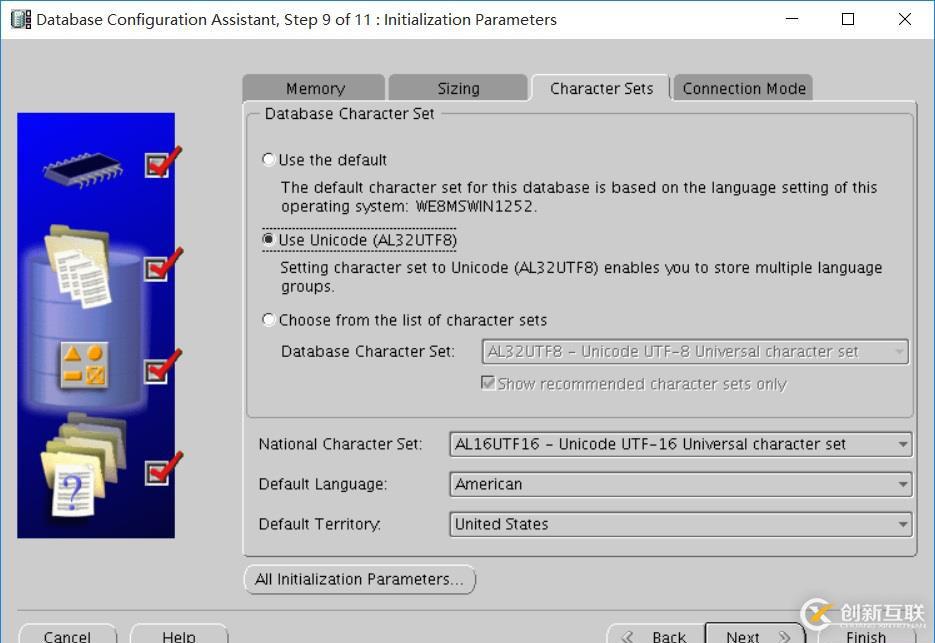
選擇sample Schemas, 系統(tǒng)會(huì)自動(dòng)配置資源參數(shù),也可以根據(jù)自己的需要?jiǎng)討B(tài)調(diào)整,字符集設(shè)置為UTF-8:
然后一路默認(rèn)配置,直到安裝完成:

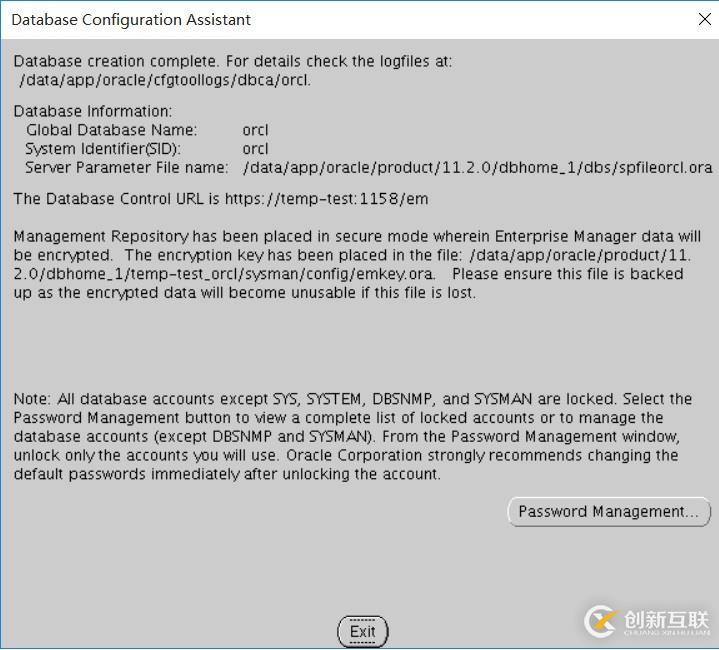
在最后的安裝完成界面,數(shù)據(jù)庫(kù)會(huì)顯示詳細(xì)的數(shù)據(jù)庫(kù)信息:
測(cè)試數(shù)據(jù)庫(kù)的連接
在配置文件添加環(huán)境變量:
vim ~/.bash_profile export ORACLE_SID=orcl source ~/.bash_profile登錄數(shù)據(jù)庫(kù):
[oracle@temp-test ~]$ sqlplus sys/oracle as sysdba SQL*Plus: Release 11.2.0.1.0 Production on Thu Nov 2 19:40:58 2017 Copyright (c) 1982, 2009, Oracle. All rights reserved. Connected to: Oracle Database 11g Enterprise Edition Release 11.2.0.1.0 - 64bit Production With the Partitioning, OLAP, Data Mining and Real Application Testing options SQL>查看數(shù)據(jù):
SQL> select name,created,log_mode,open_mode from v$database; NAME CREATED LOG_MODE OPEN_MODE --------- --------- ------------ -------------------- ORCL 02-NOV-17 NOARCHIVELOG READ WRITE感謝各位的閱讀,以上就是“Linux怎么安裝Oracle 11g”的內(nèi)容了,經(jīng)過本文的學(xué)習(xí)后,相信大家對(duì)Linux怎么安裝Oracle 11g這一問題有了更深刻的體會(huì),具體使用情況還需要大家實(shí)踐驗(yàn)證。這里是創(chuàng)新互聯(lián),小編將為大家推送更多相關(guān)知識(shí)點(diǎn)的文章,歡迎關(guān)注!
另外有需要云服務(wù)器可以了解下創(chuàng)新互聯(lián)cdcxhl.cn,海內(nèi)外云服務(wù)器15元起步,三天無(wú)理由+7*72小時(shí)售后在線,公司持有idc許可證,提供“云服務(wù)器、裸金屬服務(wù)器、高防服務(wù)器、香港服務(wù)器、美國(guó)服務(wù)器、虛擬主機(jī)、免備案服務(wù)器”等云主機(jī)租用服務(wù)以及企業(yè)上云的綜合解決方案,具有“安全穩(wěn)定、簡(jiǎn)單易用、服務(wù)可用性高、性價(jià)比高”等特點(diǎn)與優(yōu)勢(shì),專為企業(yè)上云打造定制,能夠滿足用戶豐富、多元化的應(yīng)用場(chǎng)景需求。
文章名稱:Linux怎么安裝Oracle11g-創(chuàng)新互聯(lián)
網(wǎng)站URL:http://chinadenli.net/article40/epdho.html
成都網(wǎng)站建設(shè)公司_創(chuàng)新互聯(lián),為您提供虛擬主機(jī)、網(wǎng)站收錄、移動(dòng)網(wǎng)站建設(shè)、品牌網(wǎng)站設(shè)計(jì)、搜索引擎優(yōu)化、Google
聲明:本網(wǎng)站發(fā)布的內(nèi)容(圖片、視頻和文字)以用戶投稿、用戶轉(zhuǎn)載內(nèi)容為主,如果涉及侵權(quán)請(qǐng)盡快告知,我們將會(huì)在第一時(shí)間刪除。文章觀點(diǎn)不代表本網(wǎng)站立場(chǎng),如需處理請(qǐng)聯(lián)系客服。電話:028-86922220;郵箱:631063699@qq.com。內(nèi)容未經(jīng)允許不得轉(zhuǎn)載,或轉(zhuǎn)載時(shí)需注明來(lái)源: 創(chuàng)新互聯(lián)
猜你還喜歡下面的內(nèi)容
- 如何用Python把數(shù)組和矩陣之間進(jìn)行互換-創(chuàng)新互聯(lián)
- 如何設(shè)置css中表格標(biāo)題caption標(biāo)簽的位置-創(chuàng)新互聯(lián)
- Android如何制作抽獎(jiǎng)輪盤-創(chuàng)新互聯(lián)
- 使用Django怎么實(shí)現(xiàn)一個(gè)學(xué)生管理系統(tǒng)-創(chuàng)新互聯(lián)
- 如何在Linux環(huán)境中使用php給網(wǎng)站截圖-創(chuàng)新互聯(lián)
- C語(yǔ)言如何實(shí)現(xiàn)音樂播放器-創(chuàng)新互聯(lián)
- 實(shí)現(xiàn)JavaScript跨域的方法-創(chuàng)新互聯(lián)

- 淺析網(wǎng)站靜態(tài)化和動(dòng)態(tài)化有什么區(qū)別? 2016-10-26
- 網(wǎng)站建設(shè)中的靜態(tài)頁(yè)面與動(dòng)態(tài)網(wǎng)頁(yè)哪個(gè)更好? 2016-06-18
- 怎么將網(wǎng)站生成偽靜態(tài) 2016-11-03
- 后期網(wǎng)站維護(hù)中URL靜態(tài)化分為純靜態(tài)和偽靜態(tài)兩種方法 2015-04-30
- 網(wǎng)站刷點(diǎn)擊率偽靜態(tài)為什么有利于SEO優(yōu)化 2013-12-18
- 談?wù)劸W(wǎng)站優(yōu)化當(dāng)中的偽靜態(tài)優(yōu)化技術(shù) 2016-05-11
- 一個(gè)字體比單個(gè)靜態(tài)LOGO更有用嗎? 2016-06-23
- 從外觀上來(lái)說(shuō)動(dòng)態(tài)網(wǎng)站與靜態(tài)網(wǎng)站的區(qū)別 2020-07-07
- 關(guān)于網(wǎng)站是否要靜態(tài)化HTML的問題 2015-08-07
- 成都網(wǎng)站建設(shè)怎樣選擇動(dòng)態(tài)或偽靜態(tài) 2016-08-22
- 成都網(wǎng)站建設(shè)公司分析靜態(tài)網(wǎng)頁(yè)與動(dòng)態(tài)的區(qū)別 2014-11-07
- 網(wǎng)站建設(shè)_靜態(tài)網(wǎng)站設(shè)計(jì)的回歸及特點(diǎn) 2019-05-30