如何利用SpringMVC實現(xiàn)一個用戶登錄功能
今天就跟大家聊聊有關(guān)如何利用SpringMVC 實現(xiàn)一個用戶登錄功能,可能很多人都不太了解,為了讓大家更加了解,小編給大家總結(jié)了以下內(nèi)容,希望大家根據(jù)這篇文章可以有所收獲。
創(chuàng)新互聯(lián)是一家集網(wǎng)站建設(shè),萬柏林企業(yè)網(wǎng)站建設(shè),萬柏林品牌網(wǎng)站建設(shè),網(wǎng)站定制,萬柏林網(wǎng)站建設(shè)報價,網(wǎng)絡(luò)營銷,網(wǎng)絡(luò)優(yōu)化,萬柏林網(wǎng)站推廣為一體的創(chuàng)新建站企業(yè),幫助傳統(tǒng)企業(yè)提升企業(yè)形象加強(qiáng)企業(yè)競爭力。可充分滿足這一群體相比中小企業(yè)更為豐富、高端、多元的互聯(lián)網(wǎng)需求。同時我們時刻保持專業(yè)、時尚、前沿,時刻以成就客戶成長自我,堅持不斷學(xué)習(xí)、思考、沉淀、凈化自己,讓我們?yōu)楦嗟钠髽I(yè)打造出實用型網(wǎng)站。
SpringMVC的一個登陸小案例
準(zhǔn)備工作
- 創(chuàng)建一個Dynamic Web Project(本人是Eclipse)
- 添加相關(guān)的jar包,構(gòu)建路徑
- 創(chuàng)建springMVC-servlet.xml,及完善web.xml
- 創(chuàng)建代碼邏輯
目錄結(jié)構(gòu)如下
對于新手而言,有一個項目的完整的目錄結(jié)構(gòu)是多么幸福的一件事啊。
目錄結(jié)構(gòu)
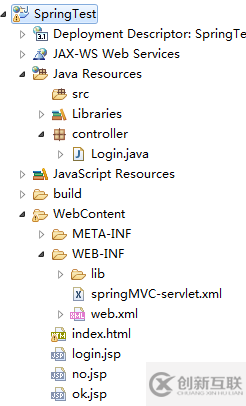
個人建議:注意其中的springMVC-servlet.xml的位置。以及源代碼包的名稱。
代碼實戰(zhàn)
首先是大管家,web.xml:
<?xml version="1.0" encoding="UTF-8"?>
<web-app xmlns:xsi="http://www.w3.org/2001/XMLSchema-instance"
xmlns="http://xmlns.jcp.org/xml/ns/javaee"
xsi:schemaLocation="http://xmlns.jcp.org/xml/ns/javaee http://xmlns.jcp.org/xml/ns/javaee/web-app_3_1.xsd"
id="WebApp_ID" version="3.1">
<display-name>SpringTest</display-name>
<welcome-file-list>
<welcome-file>index.html</welcome-file>
</welcome-file-list>
<servlet>
<servlet-name>springMVC</servlet-name>
<servlet-class>org.springframework.web.servlet.DispatcherServlet</servlet-class>
</servlet>
<servlet-mapping>
<servlet-name>springMVC</servlet-name>
<url-pattern>*.spring</url-pattern>
</servlet-mapping>
</web-app>然后是小管家springMVC-servlet.xml:
<?xml version="1.0" encoding="UTF-8"?>
<beans xmlns="http://www.springframework.org/schema/beans"
xmlns:xsi="http://www.w3.org/2001/XMLSchema-instance" xmlns:p="http://www.springframework.org/schema/p"
xmlns:context="http://www.springframework.org/schema/context"
xsi:schemaLocation="http://www.springframework.org/schema/beans http://www.springframework.org/schema/beans/spring-beans-3.0.xsd
http://www.springframework.org/schema/context http://www.springframework.org/schema/context/spring-context-3.0.xsd
http://www.springframework.org/schema/mvc http://www.springframework.org/schema/mvc/spring-mvc-3.0.xsd
http://www.springframework.org/schema/util http://www.springframework.org/schema/util/spring-util-3.0.xsd">
<!-- 最簡單的配置,讓Spring自己去探索-->
<context:component-scan base-package="controller"></context:component-scan>
</beans>再就是一個登陸界面了,login.jsp:
<%@ page language="java" contentType="text/html; charset=UTF-8"
  pageEncoding="UTF-8"%>
<!DOCTYPE html PUBLIC "-//W3C//DTD HTML 4.01 Transitional//EN" "http://www.w3.org/TR/html4/loose.dtd">
<html>
<head>
<meta http-equiv="Content-Type" content="text/html; charset=UTF-8">
<title>登陸界面</title>
</head>
<body>

  <form action="login.spring" method="post">
    username:<input type="text" name="username"><br /> Password:<input
      type="password" name="password"><br /> <input type="submit"
      value="登陸">
  </form>
</body>
</html>
login.jsp對應(yīng)的那個action就是要進(jìn)行處理的后臺頁面,也就是我們的Login.Java:
package controller;
import org.springframework.stereotype.Controller;
import org.springframework.ui.Model;
import org.springframework.web.bind.annotation.RequestMapping;
import org.springframework.web.bind.annotation.RequestParam;
@Controller // @Controller 代表本Java類是controller控制層
public class Login {
/**
* @RequestParam注解的作用是:根據(jù)參數(shù)名從URL中取得參數(shù)值
* @param username
* 用戶名,一定要對應(yīng)著表單的name才行
* @param password
* 用戶密碼,也應(yīng)該對應(yīng)表單的數(shù)據(jù)項
* @param model
* 一個域?qū)ο螅捎糜诖鎯?shù)據(jù)值
* @return
*/
@RequestMapping("/login") // @RequestMapping 注解可以用指定的URL路徑訪問本控制層
public String login(@RequestParam("username") String username, @RequestParam("password") String password,
Model model) {
if (username.equals("admin") && password.equals("admin")) {
model.addAttribute("username", username);
return "ok.jsp";
} else {
model.addAttribute("username", username);
return "no.jsp";
}
}
}最后就是ok.jsp和no.jsp了:
<%@ page language="java" contentType="text/html; charset=UTF-8"
  pageEncoding="UTF-8"%>
<!DOCTYPE html PUBLIC "-//W3C//DTD HTML 4.01 Transitional//EN" "http://www.w3.org/TR/html4/loose.dtd">
<html>
<head>
<meta http-equiv="Content-Type" content="text/html; charset=UTF-8">
<title>Insert title here</title>
</head>
<body>
<font color="green">${username } </font>歡迎你!

</body>
</html>


<%@ page language="java" contentType="text/html; charset=UTF-8"
  pageEncoding="UTF-8"%>
<!DOCTYPE html PUBLIC "-//W3C//DTD HTML 4.01 Transitional//EN" "http://www.w3.org/TR/html4/loose.dtd">
<html>
<head>
<meta http-equiv="Content-Type" content="text/html; charset=UTF-8">
<title>Insert title here</title>
</head>
<body>

  <font color="red">Sorry</font>,沒有${username }這個用戶!
  <br />
  <a href="login.jsp" rel="external nofollow" >重試一下!</a>

</body>
</html>
測試
在你的瀏覽器上輸入http://localhost:8080/SpringTest/login.jsp
然后就可以對代碼進(jìn)行測試了。本人親測好用,這里就不再貼圖了。
總結(jié)
- 在web.xml中配置DispatcherServlet核心控制器
- 在WEB-INF文件夾中創(chuàng)建springMVC-servlet.xml配置文件
- @Controller、@RequestMapping、@RequestParam以及Model域?qū)ο蟮鹊氖褂?/li>
- 表單以post方式,或者使用get方式都是可以的
下面是注解的小技巧:
@Controller就是對應(yīng)于springMVC-servlet.xml中的
看完上述內(nèi)容,你們對如何利用SpringMVC 實現(xiàn)一個用戶登錄功能有進(jìn)一步的了解嗎?如果還想了解更多知識或者相關(guān)內(nèi)容,請關(guān)注創(chuàng)新互聯(lián)行業(yè)資訊頻道,感謝大家的支持。
本文題目:如何利用SpringMVC實現(xiàn)一個用戶登錄功能
文章轉(zhuǎn)載:http://chinadenli.net/article26/jiigcg.html
成都網(wǎng)站建設(shè)公司_創(chuàng)新互聯(lián),為您提供靜態(tài)網(wǎng)站、ChatGPT、微信公眾號、建站公司、域名注冊、做網(wǎng)站
聲明:本網(wǎng)站發(fā)布的內(nèi)容(圖片、視頻和文字)以用戶投稿、用戶轉(zhuǎn)載內(nèi)容為主,如果涉及侵權(quán)請盡快告知,我們將會在第一時間刪除。文章觀點不代表本網(wǎng)站立場,如需處理請聯(lián)系客服。電話:028-86922220;郵箱:631063699@qq.com。內(nèi)容未經(jīng)允許不得轉(zhuǎn)載,或轉(zhuǎn)載時需注明來源: 創(chuàng)新互聯(lián)

- 成都建站公司應(yīng)該要怎么選擇? 2022-06-02
- 企業(yè)做網(wǎng)站建設(shè)要會考量尋找適合自己的建站公司 2022-05-18
- 洛陽網(wǎng)站建設(shè)開發(fā):建站公司報價都是從哪些方面考慮的? 2021-09-22
- 優(yōu)秀的建站公司需要看那些參考因素 2017-12-17
- 上海建站公司與企業(yè)的關(guān)系 2020-11-10
- 建站公司:網(wǎng)站建設(shè)市場混亂的原因 2022-11-12
- 三明建站公司什么樣的才是值得信賴的? 2020-11-25
- 創(chuàng)新互聯(lián)建站:建站公司如何有效的競爭力 2015-10-28
- 襄陽網(wǎng)絡(luò)公司:你知道什么樣的建站公司比較好嗎? 2021-08-07
- 如何選擇一家靠譜的建站公司? 2016-09-21
- 企業(yè)網(wǎng)站建設(shè)選擇外包建站公司的好處 2016-12-06
- 建站公司如何做網(wǎng)站才能讓甲方超預(yù)期? 2023-02-18