mybatis逆向工程與分頁在springboot中怎么用
小編給大家分享一下mybatis逆向工程與分頁在springboot中怎么用,希望大家閱讀完這篇文章之后都有所收獲,下面讓我們一起去探討吧!
作為一家“創(chuàng)意+整合+營銷”的成都網(wǎng)站建設(shè)機(jī)構(gòu),我們在業(yè)內(nèi)良好的客戶口碑。成都創(chuàng)新互聯(lián)公司提供從前期的網(wǎng)站品牌分析策劃、網(wǎng)站設(shè)計(jì)、成都網(wǎng)站建設(shè)、成都做網(wǎng)站、創(chuàng)意表現(xiàn)、網(wǎng)頁制作、系統(tǒng)開發(fā)以及后續(xù)網(wǎng)站營銷運(yùn)營等一系列服務(wù),幫助企業(yè)打造創(chuàng)新的互聯(lián)網(wǎng)品牌經(jīng)營模式與有效的網(wǎng)絡(luò)營銷方法,創(chuàng)造更大的價(jià)值。
項(xiàng)目運(yùn)行環(huán)境為:eclispe+jdk1.8+maven
搭建Spring Boot環(huán)境
首先建立maven project,在生成的pom文件中加入依賴,代碼如下:
<parent>
 <groupId>org.springframework.boot</groupId>
 <artifactId>spring-boot-starter-parent</artifactId>
 <version>1.5.2.RELEASE</version>
 <relativePath/> <!-- lookup parent from repository -->
</parent>
<properties>
 <project.build.sourceEncoding>UTF-8</project.build.sourceEncoding>
 <project.reporting.outputEncoding>UTF-8</project.reporting.outputEncoding>
 <java.version>1.8</java.version>
</properties>
<dependencies>
 <dependency>
  <groupId>org.springframework.boot</groupId>
  <artifactId>spring-boot-starter-web</artifactId>
 </dependency>
 <dependency>
  <groupId>org.springframework.boot</groupId>
  <artifactId>spring-boot-starter-test</artifactId>
 </dependency>
 <dependency>
  <groupId>org.mybatis.spring.boot</groupId>
  <artifactId>mybatis-spring-boot-starter</artifactId>
  <version>1.3.0</version>
 </dependency>
 <dependency>
  <groupId>MySQL</groupId>
  <artifactId>mysql-connector-java</artifactId>
  <scope>runtime</scope>
 </dependency>
 <!--分頁插件-->
 <dependency>
   <groupId>com.github.pagehelper</groupId>
   <artifactId>pagehelper-spring-boot-starter</artifactId>
   <version>1.2.1</version>
 </dependency>
 <!-- alibaba的druid數(shù)據(jù)庫連接池 -->
 <dependency>
  <groupId>com.alibaba</groupId>
  <artifactId>druid</artifactId>
  <version>1.0.29</version>
 </dependency>
</dependencies>
<build>
 <plugins>
  <plugin>
   <groupId>org.springframework.boot</groupId>
   <artifactId>spring-boot-maven-plugin</artifactId>
  </plugin>
  <!-- mybatis generator 自動生成代碼插件 -->
  <plugin>
   <groupId>org.mybatis.generator</groupId>
   <artifactId>mybatis-generator-maven-plugin</artifactId>
   <version>1.3.2</version>
   <configuration>
    <configurationFile>${basedir}/src/main/resources/generator/generatorConfig.xml</configurationFile>
    <overwrite>true</overwrite>
    <verbose>true</verbose>
   </configuration>
  </plugin>
 </plugins>
</build>
配置好依賴后進(jìn)行maven install,此時(shí)注意的坑:
坑一:啟動maven install報(bào)錯(cuò):
[ERROR] Failed to execute goal org.springframework.boot:spring-boot-maven-plugin:1.5.2.RELEASE:repackage (default) on project springboot-mybatis: Execution default of goal org.springframework.boot:spring-boot-maven-plugin:1.5.2.RELEASE:repackage failed: Unable to find main class -> [Help 1]
[ERROR]
[ERROR] To see the full stack trace of the errors, re-run Maven with the -e switch.
[ERROR] Re-run Maven using the -X switch to enable full debug logging.
[ERROR]
[ERROR] For more information about the errors and possible solutions, please read the following articles:
[ERROR] [Help 1] http://cwiki.apache.org/confluence/display/MAVEN/PluginExecutionException
報(bào)錯(cuò)原因是沒有啟動類
解決方法:編寫啟動類Main.java正常運(yùn)行!
@SpringBootApplication
public class Main {
 public static void main(String[] args) {
  SpringApplication.run(Main.class, args);
 }
}
坑二:啟動maven install報(bào)錯(cuò):
[ERROR] Failed to execute goal org.apache.maven.plugins:maven-compiler-plugin:3.1:compile (default-compile) on project springboot-mybatis: Compilation failure
[ERROR] No compiler is provided in this environment. Perhaps you are running on a JRE rather than a JDK?
[ERROR] -> [Help 1]
[ERROR]
[ERROR] To see the full stack trace of the errors, re-run Maven with the -e switch.
[ERROR] Re-run Maven using the -X switch to enable full debug logging.
[ERROR]
[ERROR] For more information about the errors and possible solutions, please read the following articles:
[ERROR] [Help 1] http://cwiki.apache.org/confluence/display/MAVEN/MojoFailureException
報(bào)錯(cuò)原因:項(xiàng)目的java環(huán)境與電腦環(huán)境不符合,例如我的新建項(xiàng)目運(yùn)行環(huán)境為J2SE-1.5,報(bào)錯(cuò)是在我將其改為jre1.8之后
解決方案:
右鍵項(xiàng)目——build path——Configure build path——Libraries——雙擊Jre System Libraries如下圖所示:

選擇Alternate JRE 如2處的下拉框只有jre,點(diǎn)擊3處的Install JREs,依次經(jīng)過add——Standard VM——next——Directory,選擇本機(jī)的jdk位置點(diǎn)擊finish
在install JREs位置將默認(rèn)勾選更改jdk,如下圖所示,并保存。
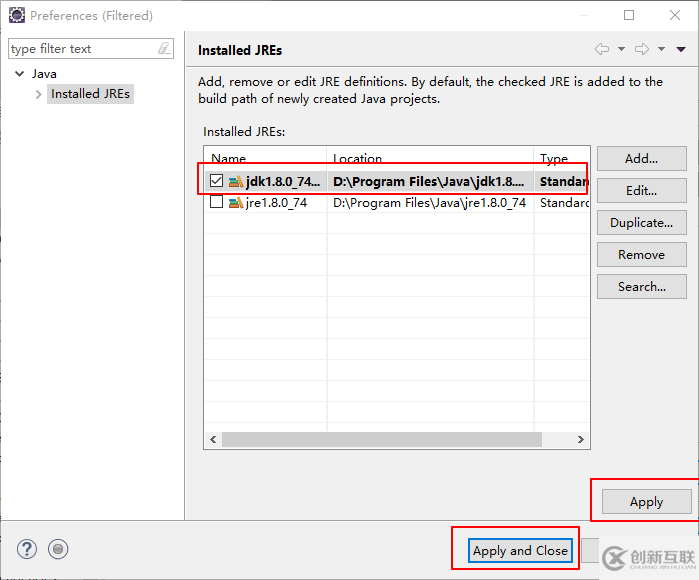
再次maven install項(xiàng)目正常。如下所示:
[INFO] BUILD SUCCESS
[INFO] ------------------------------------------------------------------------
[INFO] Total time: 3.351 s
[INFO] Finished at: 2018-09-05T21:20:48+08:00
[INFO] Final Memory: 23M/181M
[INFO] ------------------------------------------------------------------------
在src/main/resources新建文件:application.yml,內(nèi)容如下所示:
server:
 port: 8080
spring:
 datasource:
  name: test
  url: jdbc:mysql://localhost:3306/test
  username: root
  password: 123456
  driver-class-name: com.mysql.jdbc.Driver
## 該配置節(jié)點(diǎn)為獨(dú)立的節(jié)點(diǎn)
mybatis:
 mapper-locations: classpath:mapper/*.xml
#pagehelper分頁插件
pagehelper:
 helperDialect: mysql
 reasonable: true
 supportMethodsArguments: true
 params: count=countSql
至此springboot環(huán)境搭建完畢!
逆向工程應(yīng)用
首先應(yīng)該注意到在pom文件中有配置逆向工程xml文件的位置:src/main/resources/generator/generatorConfig.xml
因而在src/main/resources下新建generator文件夾,并建立generatorConfig.xml文件,代碼如下:
<?xml version="1.0" encoding="UTF-8"?>
<!DOCTYPE generatorConfiguration PUBLIC "-//mybatis.org//DTD MyBatis Generator Configuration 1.0//EN" "http://mybatis.org/dtd/mybatis-generator-config_1_0.dtd">
<generatorConfiguration>
 <!-- 數(shù)據(jù)庫驅(qū)動:選擇你的本地硬盤上面的數(shù)據(jù)庫驅(qū)動包-->
 <classPathEntry location="E:\plugins\maven\repo\mysql\mysql-connector-java\5.1.41\mysql-connector-java-5.1.41.jar"/>
 <context id="DB2Tables" targetRuntime="MyBatis3">
  <commentGenerator>
   <property name="suppressDate" value="true"/>
   <!-- 是否去除自動生成的注釋 true:是 : false:否 -->
   <property name="suppressAllComments" value="true"/>
  </commentGenerator>
  <!--數(shù)據(jù)庫鏈接URL,用戶名、密碼 -->
  <jdbcConnection driverClass="com.mysql.jdbc.Driver" connectionURL="jdbc:mysql://localhost/test" userId="root" password="123456">
  </jdbcConnection>
  <javaTypeResolver>
   <property name="forceBigDecimals" value="false"/>
  </javaTypeResolver>
  <!-- 生成pojo類的位置-->
  <javaModelGenerator targetPackage="com.luis.entity" targetProject="src/main/java">
   <property name="enableSubPackages" value="true"/>
   <property name="trimStrings" value="true"/>
  </javaModelGenerator>
  <!-- 生成映射文件的包名和位置-->
  <sqlMapGenerator targetPackage="mapper" targetProject="src/main/resources">
   <!-- enableSubPackages 是否讓schema作為包的后綴-->
   <property name="enableSubPackages" value="false"/>
  </sqlMapGenerator>
  <!-- 生成mapper接口的位置-->
  <javaClientGenerator type="XMLMAPPER" targetPackage="com.luis.mapper" targetProject="src/main/java">
   <!-- enableSubPackages 是否讓schema作為包的后綴-->
   <property name="enableSubPackages" value="false"/>
  </javaClientGenerator>
  <!-- 指定數(shù)據(jù)庫表 -->
  <table schema="" tableName="user"></table>
 </context>
</generatorConfiguration>
根據(jù)個(gè)人環(huán)境將配置文件中的配置進(jìn)行更改,如數(shù)據(jù)庫密碼,包名,對應(yīng)數(shù)據(jù)庫表
所用的數(shù)據(jù)庫表如下:
DROP TABLE IF EXISTS `user`;
CREATE TABLE `user` (
`id` bigint(20) NOT NULL,
`name` varchar(255) NOT NULL,
`age` int(4) NOT NULL,
PRIMARY KEY (`id`)
) ENGINE=InnoDB DEFAULT CHARSET=utf8;
INSERT INTO `user` VALUES ('1', 'wanger', '22');
INSERT INTO `user` VALUES ('2', 'zhangsan', '18');
INSERT INTO `user` VALUES ('3', 'lisi', '23');
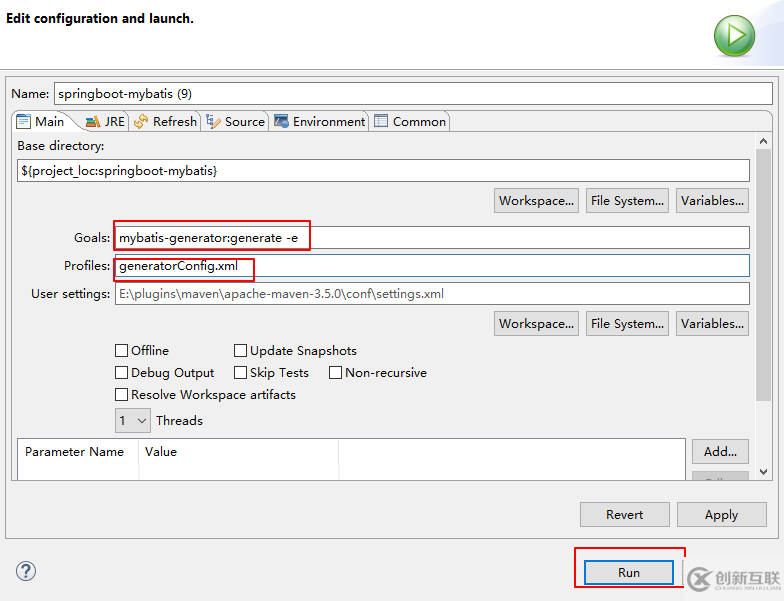
INSERT INTO `user` VALUES ('4', 'wangwu', '21');配置完成后,右鍵項(xiàng)目,選擇run as——Maven build——在下面兩處分別填入:
Goals: mybatis-generator:generate -e
Profiles: generatorConfig.xml
如下圖所示:
出現(xiàn)如下所示,代碼生成成功,刷新項(xiàng)目即可。
[INFO] Generating Example class for table user
[INFO] Generating Record class for table user
[INFO] Generating Mapper Interface for table user
[INFO] Generating SQL Map for table user
[INFO] Saving file UserMapper.xml
[INFO] Saving file UserExample.java
[INFO] Saving file User.java
[INFO] Saving file UserMapper.java
[INFO] ------------------------------------------------------------------------
[INFO] BUILD SUCCESS
[INFO] ------------------------------------------------------------------------
需要注意的是:逆向工程生成的代碼不會覆蓋,因而不能重復(fù)多次生成。
此處也有個(gè)小坑,逆向工程的代碼生成后,啟動項(xiàng)目會報(bào)如下錯(cuò)誤:
***************************
APPLICATION FAILED TO START
***************************Description:
Field userMapper in com.luis.service.impl.UserServiceImpl required a bean of type 'com.luis.mapper.UserMapper' that could not be found.
Action:
Consider defining a bean of type 'com.luis.mapper.UserMapper' in your configuration.
解決方案:
1、給生成的mapper接口文件前加注解:@Mapper 即可解決。但需要給每一個(gè)mapper文件前加,繁瑣,因而有第二種類
解決辦法
2、在啟動類前加@MapperScan({"com.luis.mapper"}),其中com.luis.mapper為mapper文件的所在位置。
參考自:http://412887952-qq-com.iteye.com/blog/2392672
分頁應(yīng)用
逆向工程已經(jīng)生成了entity類,及dao層的mapper接口與*mapper.xml文件,因而/只用編寫service層與web層。
首先在UserService中編寫接口,代碼如下:
public interface UserService {
 User selectByName(String name);
 List<User> findAllUser(int pageNum, int pageSize);
}
在UserServiceImpl文件進(jìn)行實(shí)現(xiàn),代碼如下所示:
@Service
public class UserServiceImpl implements UserService {
 @Autowired
 private UserMapper userMapper;
 @Override
 public User selectByName(String name) {
  UserExample example = new UserExample();
  Criteria criteria = example.createCriteria();
  criteria.andNameEqualTo(name);
  List<User> users = userMapper.selectByExample(example);
  if (users != null && users.size() > 0) {
   return users.get(0);
  }
  return null;
 }
 /**
  * pageNum 開始頁數(shù)
  * pageSize 每頁顯示的數(shù)據(jù)條數(shù)
  */
 @Override
 public List<User> findAllUser(int pageNum, int pageSize) {
  //將參數(shù)傳給方法實(shí)現(xiàn)分頁
  PageHelper.startPage(pageNum, pageSize);
  UserExample example = new UserExample();
  List<User> list = userMapper.selectByExample(example);
  return list;
 }
}
最后在controller層對查詢結(jié)果進(jìn)行接收,UserController代碼如下:
@Controller
@RestController
public class UserController {
 @Autowired
 private UserService userService;
 @RequestMapping("/test")
 public User querUserByName() {
  User user = userService.selectByName("luis");
  System.out.println(user.toString());
  return user;
 }
 @RequestMapping("/list")
 public List<User> querUser() {
  List<User> list = userService.findAllUser(1, 2);
  //獲取分頁信息
  PageInfo<User> pageInfo = new PageInfo<>(list);
  System.out.println("total:" + pageInfo.getTotal());
  System.out.println("pages:" + pageInfo.getPages());
  System.out.println("pageSize:" + pageInfo.getPageSize());
  return list;
 }
}
測試
此前在項(xiàng)目編寫過程中已經(jīng)對可能出現(xiàn)的錯(cuò)誤進(jìn)行了總結(jié),最后,對項(xiàng)目的功能進(jìn)行測試,通過加@RestController注解將數(shù)據(jù)傳輸?shù)綖g覽器中。
測試mybatis與springboot,瀏覽器輸入http://localhost:8080/test,瀏覽器輸出:
{"id":1,"name":"wanger","age":22}
分頁測試,瀏覽器輸入http://localhost:8080/list,瀏覽器輸出:
[{"id":1,"name":"wanger","age":22},{"id":2,"name":"zhangsan","age":18}]
eclipse輸出:
total:4
pages:2
pageSize:2
項(xiàng)目搭建完畢,具體代碼參見github
看完了這篇文章,相信你對“mybatis逆向工程與分頁在springboot中怎么用”有了一定的了解,如果想了解更多相關(guān)知識,歡迎關(guān)注創(chuàng)新互聯(lián)行業(yè)資訊頻道,感謝各位的閱讀!
網(wǎng)站標(biāo)題:mybatis逆向工程與分頁在springboot中怎么用
文章源于:http://chinadenli.net/article22/ghoscc.html
成都網(wǎng)站建設(shè)公司_創(chuàng)新互聯(lián),為您提供云服務(wù)器、ChatGPT、網(wǎng)站導(dǎo)航、定制開發(fā)、網(wǎng)站排名、虛擬主機(jī)
聲明:本網(wǎng)站發(fā)布的內(nèi)容(圖片、視頻和文字)以用戶投稿、用戶轉(zhuǎn)載內(nèi)容為主,如果涉及侵權(quán)請盡快告知,我們將會在第一時(shí)間刪除。文章觀點(diǎn)不代表本網(wǎng)站立場,如需處理請聯(lián)系客服。電話:028-86922220;郵箱:631063699@qq.com。內(nèi)容未經(jīng)允許不得轉(zhuǎn)載,或轉(zhuǎn)載時(shí)需注明來源: 創(chuàng)新互聯(lián)

- 成都在線英語學(xué)習(xí)APP開發(fā) 快樂學(xué)習(xí)英語 2022-06-01
- 如何在青島找靠譜的app開發(fā)公司? 2023-03-26
- APP開發(fā)要做“減法” 2016-08-09
- 成都app開發(fā)該如何才能吸引用戶的注意 2016-12-15
- 創(chuàng)業(yè)公司選擇小程序開發(fā)還是App開發(fā)? 2020-11-27
- 怎么使你的APP一夜爆紅,創(chuàng)新互聯(lián)APP開發(fā)秘籍傳授 2022-08-08
- 成都網(wǎng)絡(luò)戀愛社交APP開發(fā) 2022-05-29
- 成都商城APP開發(fā)多少錢? 2022-06-26
- App開發(fā)的10個(gè)流程 2016-08-17
- 移動產(chǎn)品時(shí)常更新?lián)Q代,成都app開發(fā)機(jī)會不斷 2022-08-01
- 大連APP開發(fā)公司外包項(xiàng)目的優(yōu)勢 2023-03-16
- 誰在影響APP開發(fā)的時(shí)間 2022-11-14