微信小程序中怎么實現拖動圖片實現移動、放大、旋轉
這篇文章將為大家詳細講解有關微信小程序中怎么實現拖動圖片實現移動、放大、旋轉,文章內容質量較高,因此小編分享給大家做個參考,希望大家閱讀完這篇文章后對相關知識有一定的了解。
我們提供的服務有:成都網站建設、做網站、微信公眾號開發(fā)、網站優(yōu)化、網站認證、新河ssl等。為超過千家企事業(yè)單位解決了網站和推廣的問題。提供周到的售前咨詢和貼心的售后服務,是有科學管理、有技術的新河網站制作公司
微信小程序這里提供了兩個API
wx.createContext() 創(chuàng)建并返回繪圖上下文context對象
getActions 獲取當前context上存儲的繪圖動作,對應wx.drawCanvas(object)中的actions
clearActions 清空當前的存儲繪圖動作
wx.drawCanvas(object) 繪制
canvasId 畫布標識,傳入的cavas-id,這里的標識可以為Number,也可以是String
actions 繪圖動作數組,由wx.createContext創(chuàng)建的context,調用getActions方法導出繪圖動作數組。
最近接到一個任務,在微信小程序內拖動圖片組件實現移動、放大、旋轉,并記錄這些圖片的移動位置,放大比例,旋轉角度,在一個畫布上生成一張圖片,最后保存到手機相冊。
我的具體實現思路是這樣的:
一共三個功能,可以先把功能分為圖片 拖動 和圖片 旋轉縮放 , 把圖片的縮放和旋轉做在了一起。
1.圖片移動:可移動的圖片肯定是要動態(tài)生成的,所以不能寫死,應該是個數組,具備很多的屬性。
例如:(并不是我項目的真實數據)
itemList: [{
      id: 1,
      image: '1.png',//圖片地址
      top: 100,//初始圖片的位置
      left: 100,
      x: 155, //初始圓心位置,可再downImg之后又寬高和初始的圖片位置得出
      y: 155,
      scale: 1,//縮放比例 1為不縮放
      angle: 0,//旋轉角度
      active: false //判定點擊狀態(tài)
    }, {
      id: 2,
      image: '2.png',
      top: 50,
      left: 50,
      x: 155,
      y: 155,
      scale: 1,
      angle: 0,
      active: false
事件綁定圖片上或者圖片的父級,綁定bindtouchstart bindtouchmove事件。再bindtouchstart事件里,獲取手指點擊的某一個圖片的點擊坐標,并記錄在這個圖片對象的屬性里面,在bindtouchmove事件里,移動的時候記錄移動后的坐標,并算出倆次滑動的距離差值,追加給圖片對象的left、top、x、y上,最后把本次滑動的坐標賦值給bindtouchmove事件里拿到的坐標,作為老坐標。這樣就可以實現圖片的滑動。
注:代碼里的 items 只是我定義的一個全局變量,是一個空數組,在onLoad函數里 items = this.data.itemLits;
這樣就不會頻繁的去setData,我只需要處理items,處理完之后,再this.setData({itemLits:items })
WraptouchStart: function (e) {
    for (let i = 0; i < items.length; i++) { //旋轉數據找到點擊的
      items[i].active = false;
      if (e.currentTarget.dataset.id == items[i].id) {
        index = i;  //記錄下標
        items[index].active = true; //開啟點擊屬性
      }
    }

    items[index].lx = e.touches[0].clientX; // 記錄點擊時的坐標值
    items[index].ly = e.touches[0].clientY;
    this.setData({  //賦值
      itemList: items
    })
  }
  , WraptouchMove: function (e) {
    //移動時的坐標值也寫圖片的屬性里
    items[index]._lx = e.touches[0].clientX;
    items[index]._ly = e.touches[0].clientY;

    //追加改動值
    items[index].left += items[index]._lx - items[index].lx; // x方向
    items[index].top += items[index]._ly - items[index].ly;  // y方向
    items[index].x += items[index]._lx - items[index].lx;
    items[index].y += items[index]._ly - items[index].ly;

    //把新的值賦給老的值
    items[index].lx = e.touches[0].clientX;
    items[index].ly = e.touches[0].clientY;
    this.setData({//賦值就移動了
      itemList: items
    })
  }
2.圖片的旋轉和縮放,因為圖片上已經有了touch事件,所以解決辦法采用常規(guī)的在圖片的一角添加一個控件解決這個問題,控件大致如圖:
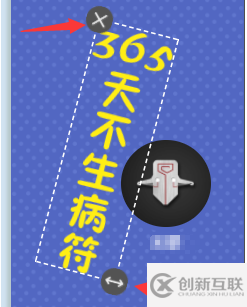
左邊控件是刪除按鈕,右邊控件則是手指按著旋轉切縮放圖片的控件,綁定bindtouchstart bindtouchmove事件。
index也是設置的全局變量。
// 觸摸開始事件 items是this.data.itemList的全局變量,便于賦值 所有的值都應給到對應的對象里
  touchStart: function (e) {
    //找到點擊的那個圖片對象,并記錄
    for (let i = 0; i < items.length; i++) {
      items[i].active = false;

      if (e.currentTarget.dataset.id == items[i].id) {
        console.log('e.currentTarget.dataset.id', e.currentTarget.dataset.id)
        index = i;
        console.log(items[index])
        items[index].active = true;
      }
    }
     //獲取作為移動前角度的坐標
    items[index].tx = e.touches[0].clientX;
    items[index].ty = e.touches[0].clientY;
    //移動前的角度
    items[index].anglePre = this.countDeg(items[index].x, items[index].y, items[index].tx, items[index].ty)
    //獲取圖片半徑
    items[index].r = this.getDistancs(items[index].x, items[index].y, items[index].left, items[index].top)
  },
  // 觸摸移動事件
  touchMove: function (e) {
    //記錄移動后的位置
    items[index]._tx = e.touches[0].clientX;
    items[index]._ty = e.touches[0].clientY;
    //移動的點到圓心的距離 * 因為圓心的坐標是相對與父元素定位的 ,所有要減去父元素的OffsetLeft和OffsetTop來計算移動的點到圓心的距離
    items[index].disPtoO = this.getDistancs(items[index].x, items[index].y, items[index]._tx - this.sysData.windowWidth * 0.125, items[index]._ty - 10)

    items[index].scale = items[index].disPtoO / items[index].r; //手指滑動的點到圓心的距離與半徑的比值作為圖片的放大比例
    items[index].oScale = 1 / items[index].scale;//圖片放大響應的右下角按鈕同比縮小

    //移動后位置的角度
    items[index].angleNext = this.countDeg(items[index].x, items[index].y, items[index]._tx, items[index]._ty)
    //角度差
    items[index].new_rotate = items[index].angleNext - items[index].anglePre;

    //疊加的角度差
    items[index].rotate += items[index].new_rotate;
    items[index].angle = items[index].rotate; //賦值

    //用過移動后的坐標賦值為移動前坐標
    items[index].tx = e.touches[0].clientX;
    items[index].ty = e.touches[0].clientY;
    items[index].anglePre = this.countDeg(items[index].x, items[index].y, items[index].tx, items[index].ty)

    //賦值setData渲染
    this.setData({
      itemList: items
    })
  }
頁面上是這樣寫的:
<!-- *************操作區(qū)域************* -->
    <block wx:for="{{itemList}}" wx:key="{{item.id}}">
      <!-- 圓心坐標 <text style='position:absolute;top:{{item.y}}px;left:{{item.x}}px;width:2px;height:2px;background-color:yellow;z-index:500'></text> -->
      <view class='touchWrap' style='transform: scale({{item.scale}});top:{{item.top}}px;left:{{item.left}}px; '>
        <view class='imgWrap {{item.active? "touchActive":""}}' >
          <image src='{{item.image}}' data-id='{{item.id}}' style='width:{{item.width}}px;height:{{item.height}}px;' bindtouchstart='WraptouchStart' bindload='loadImg' hidden='{{!item.isload}} bindtouchmove='WraptouchMove' bindtouchend='WraptouchEnd'></image>
          <image class='x' src='../../images/x.png' style='transform: scale({{item.oScale}});transform-origin:center;' data-id='{{item.id}}' bindtap='deleteItem'></image>
          <image class='o' src='../../images/o.png' style='transform: scale({{item.oScale}});transform-origin:center;' data-id='{{item.id}}' bindtouchstart='touchStart' bindtouchmove='touchMove' bindtouchend='touchEnd'></image>
        </view>
      </view>
    </block>
<!-- **************操作區(qū)域************ -->
這樣一來就解決了微信小程序內拖動圖片實現移動、放大、旋轉的問題,操作也比較順滑,也耗費我近四天的時間才把我的小程序上線,代碼有點混亂,如果各位大佬有什么意見可以給我留言,我的小程序名字是:水逆轉運符文,以后會持續(xù)改進。
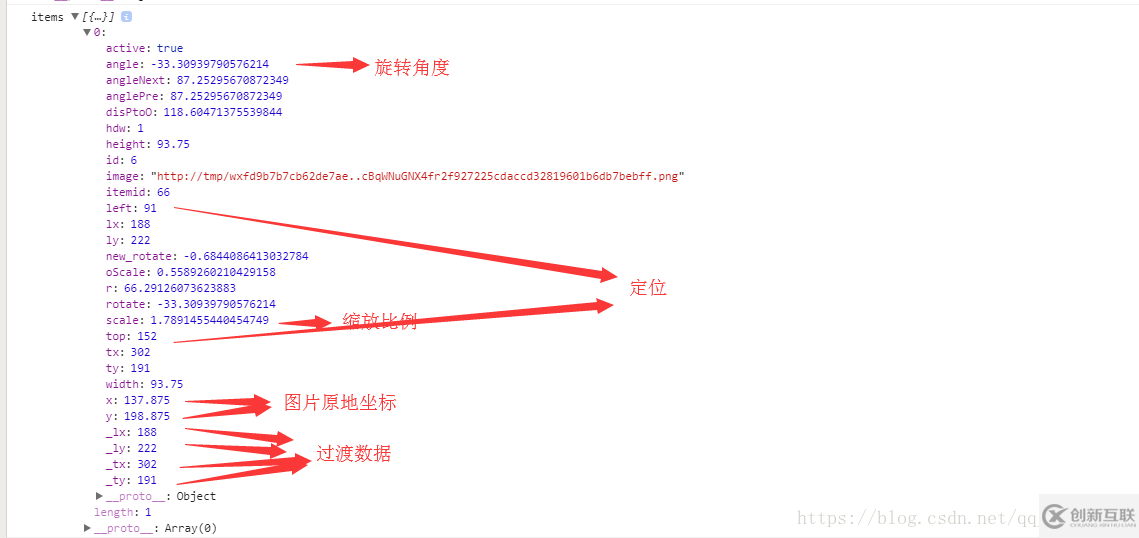
2018/5/7補充一條生成圖片時,組件的屬性:
我的失誤,忘了附上角度計算函數 countDeg :
/*
 *參數1和2為圖片圓心坐標
 *參數3和4為手點擊的坐標
 *返回值為手點擊的坐標到圓心的角度
 */
  countDeg: function (cx, cy, pointer_x, pointer_y) {
    var ox = pointer_x - cx;
    var oy = pointer_y - cy;
    var to = Math.abs(ox / oy);
    var angle = Math.atan(to) / (2 * Math.PI) * 360;//鼠標相對于旋轉中心的角度
    console.log("ox.oy:", ox, oy)
    if (ox < 0 && oy < 0)//相對在左上角,第四象限,js中坐標系是從左上角開始的,這里的象限是正常坐標系
    {
      angle = -angle;
    } else if (ox <= 0 && oy >= 0)//左下角,3象限
    {
      angle = -(180 - angle)
    } else if (ox > 0 && oy < 0)//右上角,1象限
    {
      angle = angle;
    } else if (ox > 0 && oy > 0)//右下角,2象限
    {
      angle = 180 - angle;
    }

    return angle;
  }
計算觸摸點到圓心的距離:
getDistancs(cx, cy, pointer_x, pointer_y) {
    var ox = pointer_x - cx;
    var oy = pointer_y - cy;
    return Math.sqrt(
      ox * ox + oy * oy
    );
  }
點擊配件時的事件(因為再我測試在canvas中,圖片不能是網絡路徑,所以需要下載): 【18/6/22】
tpDownload: function(data, isDownload) { //data為組件的參數,isDownload判斷是否為https網絡圖片來判斷是否需要下載
    if (yy < 0) { //改變生成圖片時的位置
      speed = -speed
    }
    if (yy > 300) {
      speed = -speed
    }
    yy += speed;
    let _this = this;
    let newTpdata = {};
    newTpdata.id = data.id;
    newTpdata.itemid = data.itemid;
    newTpdata.top = 100 + yy;
    newTpdata.left = 100;
    newTpdata.width = _this.sysData.windowWidth / 4;
    newTpdata.scale = 1;
    newTpdata.angle = 0;
    newTpdata.rotate = 0;
    newTpdata.active = true;
    for (let i = 0; i < items.length; i++) {
      items[i].active = false;
    }
    if (isDownload) {
      wx.downloadFile({
        url: data.image,
        success: res => {
          newTpdata.image = res.tempFilePath;
          items.push(newTpdata);
          _this.setData({
            itemList: items
          })
          wx.hideLoading();
        }
      })
    } else {
      newTpdata.image = data.image;
      items.push(newTpdata);
      _this.setData({
        itemList: items
      })
      wx.hideLoading();
    }
  }
我的項目中生成canvas用到的代碼 (繪圖是通過保存按鈕觸發(fā))
save: function() {
    this.setData({
      showCanvas: true,
      canvasHeight: this.sysData.windowHeight * 0.85
    })
    let obj = this.data.item;
    /*
    canvasWidth值為canvas寬度;
    this.data.canvasPre是占屏幕寬度的百分比(80)
    */
    let canvasWidth = this.sysData.windowWidth * this.data.canvasPre / 100; //
    /*
    num為canvas內背景圖占canvas的百分比,若全背景num =1
    this.sysData.windowWidth * 0.75為可移動區(qū)的寬度
    prop值為canvas內背景的寬度與可移動區(qū)域的寬度的比,如一致,則prop =1;
    */
    let prop = (canvasWidth * num) / (this.sysData.windowWidth * 0.75);
    maskCanvas.save();
    maskCanvas.beginPath();
    //一張白圖
    maskCanvas.setFillStyle('#fff');
    maskCanvas.fillRect(0, 0, this.sysData.windowWidth, this.data.canvasHeight)
    maskCanvas.closePath();
    maskCanvas.stroke();
    //圖頭像
    let image = {
      w: canvasWidth * num * 0.287,
      h: canvasWidth * num * 0.287,
      r: canvasWidth * num * 0.287 / 2
    };
    //畫背景 hCw 為 1.7781 背景圖的高寬比
    maskCanvas.drawImage(obj.bgImg, canvasWidth * (1 - num) / 2, 10, canvasWidth * num, canvasWidth * num * hCw)
    //畫底圖
    maskCanvas.drawImage('../../images/xcx.png', canvasWidth * (1 - num) / 2, canvasWidth * num * hCw + 15, canvasWidth * num, this.data.canvasHeight * 0.15)
    //畫原
    maskCanvas.save();
    maskCanvas.beginPath();
    maskCanvas.arc(canvasWidth / 2, canvasWidth * num * hCw * obj.userTop / 100 + 10 + image.w / 2, image.r, 0, Math.PI * 2, false);
    // maskCanvas.stroke()
    maskCanvas.clip(); //截取
    //畫頭像
    maskCanvas.drawImage(obj.avatarUrl, (canvasWidth - image.w) / 2, canvasWidth * num * hCw * obj.userTop / 100 + 10, image.w, image.h)
    maskCanvas.closePath();
    maskCanvas.restore();
    //繪制文字
    maskCanvas.save();
    maskCanvas.beginPath();
    let fontSize = this.sysData.screenWidth / 375 * 15;
    let textColor = obj.color || '#000';
    maskCanvas.setFontSize(parseInt(fontSize) * prop)
    maskCanvas.setFillStyle(textColor)
    maskCanvas.setTextAlign('center')
    maskCanvas.fillText(obj.nickName, canvasWidth / 2, obj.titleTop / 100 * canvasWidth * num * hCw + 10 * 0.9 * prop + fontSize * prop);
    maskCanvas.closePath();
    maskCanvas.stroke();
    /**
     * x
     * y
     * scale
     * prop
     * width
     * height
     *
     */
    //畫組件
    items.forEach((currentValue,index)=>{
      maskCanvas.save();
      maskCanvas.translate(canvasWidth * (1 - num) / 2, 10);
      maskCanvas.beginPath();
      maskCanvas.translate(currentValue.x * prop, currentValue.y * prop); //圓心坐標
      maskCanvas.rotate(currentValue.angle * Math.PI / 180); // 旋轉值
      maskCanvas.translate(-(currentValue.width * currentValue.scale * prop / 2), -(currentValue.height * currentValue.scale * prop / 2))
      maskCanvas.drawImage(currentValue.image, 0, 0, currentValue.width * currentValue.scale * prop, currentValue.height * currentValue.scale * prop);
      maskCanvas.restore();
    })
    maskCanvas.draw(false, (e)=> {
      wx.canvasToTempFilePath({
        canvasId: 'maskCanvas',
        success: res => {
          this.setData({
            canvasTemImg: res.tempFilePath
          })
        }
      }, this)
    })
  }
關于微信小程序中怎么實現拖動圖片實現移動、放大、旋轉就分享到這里了,希望以上內容可以對大家有一定的幫助,可以學到更多知識。如果覺得文章不錯,可以把它分享出去讓更多的人看到。
當前文章:微信小程序中怎么實現拖動圖片實現移動、放大、旋轉
當前URL:http://chinadenli.net/article10/gphsdo.html
成都網站建設公司_創(chuàng)新互聯,為您提供網站營銷、品牌網站建設、營銷型網站建設、微信小程序、Google、響應式網站
聲明:本網站發(fā)布的內容(圖片、視頻和文字)以用戶投稿、用戶轉載內容為主,如果涉及侵權請盡快告知,我們將會在第一時間刪除。文章觀點不代表本網站立場,如需處理請聯系客服。電話:028-86922220;郵箱:631063699@qq.com。內容未經允許不得轉載,或轉載時需注明來源: 創(chuàng)新互聯

- 企業(yè)網站制作如何留住客戶 2021-12-27
- 北京企業(yè)網站制作完成后該如何為引流? 2023-03-23
- 企業(yè)網站制作行政管理模塊有哪些功能? 2021-07-19
- 高端網頁設計的標準方法-成都企業(yè)網站制作公司 2023-02-19
- 企業(yè)網站制作應當有哪些特色? 2013-05-03
- 企業(yè)網站制作開發(fā)費用成本有哪些? 2023-04-07
- 企業(yè)網站制作的常見問題集合 2023-01-05
- 決定企業(yè)網站制作的價格的因素分析 2021-09-28
- 淺析企業(yè)網站制作都需要注意哪些問題? 2016-10-03
- 小型企業(yè)網站制作方案 2016-09-23
- 企業(yè)網站制作如何突出網站特點? 2023-04-13
- 深圳企業(yè)網站制作需要注意的問題有哪些 2021-08-25