Nginx+Apache動靜分離部署過程
本篇內(nèi)容主要講解“Nginx+Apache動靜分離部署過程”,感興趣的朋友不妨來看看。本文介紹的方法操作簡單快捷,實(shí)用性強(qiáng)。下面就讓小編來帶大家學(xué)習(xí)“Nginx+Apache動靜分離部署過程”吧!
成都創(chuàng)新互聯(lián)公司是一家集成都網(wǎng)站建設(shè)、成都網(wǎng)站制作、網(wǎng)站頁面設(shè)計、網(wǎng)站優(yōu)化SEO優(yōu)化為一體的專業(yè)的建站公司,已為成都等多地近百家企業(yè)提供網(wǎng)站建設(shè)服務(wù)。追求良好的瀏覽體驗,以探求精品塑造與理念升華,設(shè)計最適合用戶的網(wǎng)站頁面。 合作只是第一步,服務(wù)才是根本,我們始終堅持講誠信,負(fù)責(zé)任的原則,為您進(jìn)行細(xì)心、貼心、認(rèn)真的服務(wù),與眾多客戶在蓬勃發(fā)展的市場環(huán)境中,互促共生。
Nginx+Apache動靜分離部署
為什么需要部署Nginx+Apache動靜分離?
之前在講解基于LNMP架構(gòu)的Discuz論壇搭建(原文鏈接:https://blog.51cto.com/14557673/2461480 )的時候?qū)屿o分離有所提及,這邊簡述一下核心原因:
根據(jù)Nginx服務(wù)的特性,其擅長處理靜態(tài)網(wǎng)站(圖片文字視頻等文件)訪問資源,而Apache擅長動態(tài)處理(例如:賬號注冊的交互)。
因此我們可以結(jié)合這兩個服務(wù)特點(diǎn)與優(yōu)勢,部署實(shí)現(xiàn)網(wǎng)站服務(wù)的動靜分離。
部署Nginx+Apache動靜分離實(shí)例
實(shí)驗環(huán)境:兩臺Centos7虛擬機(jī),一臺為LAMP架構(gòu),另一臺為nginx服務(wù)
首先我們需要搭建LAMP架構(gòu),這次我們使用yum直接進(jìn)行搭建LAMP,具體步驟如下:
在一臺虛擬機(jī)上安裝搭建LAMP架構(gòu):
===================LAMP簡易版搭建==================
1.安裝httpd
yum install -y httpd httpd-devel
systemctl start httpd.service
[root@lamp ~]# ifconfig ens33
ens33: flags=4163<UP,BROADCAST,RUNNING,MULTICAST>  mtu 1500
        inet 192.168.68.144  netmask 255.255.255.0  broadcast 192.168.68.255
        inet6 fe80::7330:498c:44ce:c5f7  prefixlen 64  scopeid 0x20<link>
        ether 00:0c:29:cc:52:c8  txqueuelen 1000  (Ethernet)
        RX packets 659954  bytes 964992071 (920.2 MiB)
        RX errors 0  dropped 0  overruns 0  frame 0
        TX packets 339462  bytes 20930426 (19.9 MiB)
        TX errors 0  dropped 0 overruns 0  carrier 0  collisions 0

[root@lamp ~]# yum install -y httpd httpd-devel
[root@lamp ~]# systemctl start httpd.service
[root@lamp ~]# netstat -antp | grep httpd
tcp6       0      0 :::80                   :::*                    LISTEN      57584/httpd
2.防火墻設(shè)置(也可以直接關(guān)閉)
firewall-cmd --permanent --zone=public --add-service=http
firewall-cmd --permanent --zone=public --add-service=https
firewall-cmd --reload
[root@lamp ~]# firewall-cmd --permanent --zone=public --add-service=http
success
[root@lamp ~]# firewall-cmd --permanent --zone=public --add-service=https
success
[root@lamp ~]# firewall-cmd --reload
success
3.安裝mariadb 數(shù)據(jù)庫
yum install mariadb mariadb-server mariadb-libs mariadb-devel -y
mariadb 快速簡單輕量的快捷數(shù)據(jù)庫
[root@lamp ~]# yum install mariadb mariadb-server mariadb-libs mariadb-devel -y
4.啟動服務(wù)
systemctl start mariadb
[root@lamp ~]# systemctl start mariadb.service
[root@lamp ~]# netstat -antp | grep 3306
tcp        0      0 0.0.0.0:3306            0.0.0.0:*               LISTEN      67480/MySQLd
5.執(zhí)行mysql安全配置向?qū)?br/>mysql_secure_installation
[root@lamp ~]# mysql_secure_installation    //需要交互

NOTE: RUNNING ALL PARTS OF THIS SCRIPT IS RECOMMENDED FOR ALL MariaDB
      SERVERS IN PRODUCTION USE!  PLEASE READ EACH STEP CAREFULLY!

In order to log into MariaDB to secure it, we'll need the current
password for the root user.  If you've just installed MariaDB, and
you haven't set the root password yet, the password will be blank,
so you should just press enter here.

Enter current password for root (enter for none):   //沒有密碼。直接回車
OK, successfully used password, moving on...

Setting the root password ensures that nobody can log into the MariaDB
root user without the proper authorisation.

Set root password? [Y/n] y           //設(shè)置root密碼自己輸入
New password:
Re-enter new password:
Password updated successfully!
Reloading privilege tables..
 ... Success!

By default, a MariaDB installation has an anonymous user, allowing anyone
to log into MariaDB without having to have a user account created for
them.  This is intended only for testing, and to make the installation
go a bit smoother.  You should remove them before moving into a
production environment.

Remove anonymous users? [Y/n] n   //選擇是否移除匿名用戶,自己選擇
 ... skipping.

Normally, root should only be allowed to connect from 'localhost'.  This
ensures that someone cannot guess at the root password from the network.

Disallow root login remotely? [Y/n] n    //是否不允許root遠(yuǎn)程登錄
 ... skipping.

By default, MariaDB comes with a database named 'test' that anyone can
access.  This is also intended only for testing, and should be removed
before moving into a production environment.

Remove test database and access to it? [Y/n] n    //是否移除測試數(shù)據(jù)庫
 ... skipping.

Reloading the privilege tables will ensure that all changes made so far
will take effect immediately.

Reload privilege tables now? [Y/n] y    //重載刷新
 ... Success!

Cleaning up...

All done!  If you've completed all of the above steps, your MariaDB
installation should now be secure.

Thanks for using MariaDB!
6.安裝PHP
yum -y install php
[root@lamp ~]# yum -y install php
7.安裝PHP與mysql關(guān)聯(lián)包
yum install php-mysql -y
[root@lamp ~]# yum install php-mysql -y
8.安裝php插件
yum install -y php-gd php-ldap php-odbc php-pear php-xml php-xmlrpc php-mbstring php-snmp php-soap
[root@lamp ~]# yum install -y php-gd php-ldap php-odbc php-pear php-xml php-xmlrpc php-mbstring php-snmp php-soap
9.創(chuàng)建PHP網(wǎng)頁內(nèi)容
cd /var/www/html
vim index.php
<?php
phpinfo();
?>
[root@lamp html]# cd /var/www/html/
[root@lamp html]# vim index.php
[root@lamp html]# cat index.php
<?php
        phpinfo();
?>
10.重啟httpd服務(wù)
systemctl restart httpd
[root@lamp html]# systemctl restart httpd.service
[root@lamp ~]# netstat -antp | grep httpd
tcp6       0      0 :::80                   :::*                    LISTEN      57584/httpd
11.測試架構(gòu)是否搭建成功
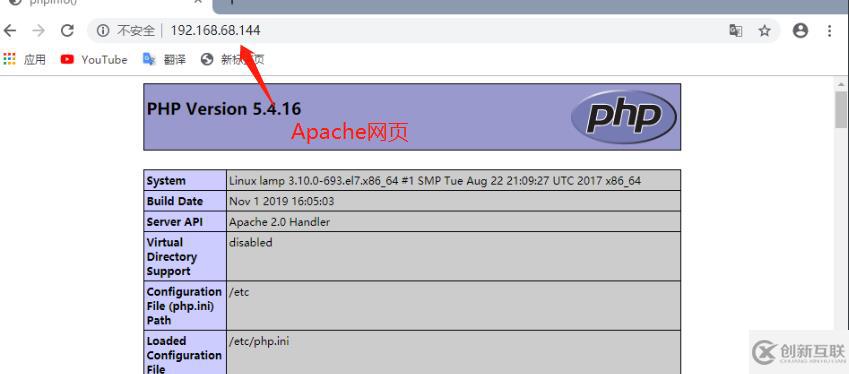
在另一臺虛擬機(jī)上進(jìn)行手工編譯安裝nginx:
=====================nginx服務(wù)器配置============================
手工編譯安裝Nginx服務(wù)
1.安裝環(huán)境包
yum -y install gcc gcc-c++ pcre-devel zlib-devel
[root@nginx ~]# ifconfig ens33
ens33: flags=4163<UP,BROADCAST,RUNNING,MULTICAST>  mtu 1500
        inet 192.168.68.136  netmask 255.255.255.0  broadcast 192.168.68.255
        inet6 fe80::f14b:5f19:2889:b137  prefixlen 64  scopeid 0x20<link>
        ether 00:0c:29:f3:5e:0b  txqueuelen 1000  (Ethernet)
        RX packets 69672  bytes 100983394 (96.3 MiB)
        RX errors 0  dropped 0  overruns 0  frame 0
        TX packets 34582  bytes 2297096 (2.1 MiB)
        TX errors 0  dropped 0 overruns 0  carrier 0  collisions 0

[root@nginx ~]# yum -y install gcc gcc-c++ pcre-devel zlib-devel
2.解壓縮軟件包
tar zxf nginx-1.12.2 tar.gz -C /opt/
[root@nginx LNMP-C7]# tar zxf nginx-1.12.2.tar.gz -C /opt/
[root@nginx LNMP-C7]# cd /opt/nginx-1.12.2/
[root@nginx nginx-1.12.2]# ls
auto     CHANGES.ru  configure  html     man     src
CHANGES  conf        contrib    LICENSE  README
3.創(chuàng)建家目錄但不創(chuàng)建家目錄
useradd -M -s /sbin/nologin nginx
[root@nginx nginx-1.12.2]# useradd -M -s /sbin/nologin nginx
4.配置相關(guān)參數(shù)
cd /opt/nginx-1.12.0
./configure \
--prefix=/usr/local/nginx \
--user=nginx \
--group=nginx \
--with-http_stub_status_module
[root@nginx nginx-1.12.2]# ./configure \
> --prefix=/usr/local/nginx \
> --user=nginx \
> --group=nginx \
> --with-http_stub_status_module
5.編譯安裝
make &&make install
[root@nginx nginx-1.12.2]# make && make install
6.創(chuàng)建軟鏈接
ln -s /usr/local/nginx/sbin/nginx /usr/local/sbin/
[root@nginx nginx-1.12.2]# ln -s /usr/local/nginx/sbin/nginx /usr/local/sbin/
7.配置文件設(shè)置
vim /usr/local/nginx/conf/nginx.conf
location ~ .php$ {
proxy_pass http://192.168.68.144;
}
[root@nginx nginx-1.12.2]# ln -s /usr/local/nginx/sbin/nginx /usr/local/sbin/
[root@nginx nginx-1.12.2]# vim /usr/local/nginx/conf/nginx.conf
[root@nginx nginx-1.12.2]# sed -n '59,61p' /usr/local/nginx/conf/nginx.conf
        location ~ \.php$ {
            proxy_pass   http://192.168.68.144;
        }
8.開啟nginx服務(wù)
nginx
[root@nginx nginx-1.12.2]# nginx
[root@nginx nginx-1.12.2]# netstat -antp | grep nginx
tcp        0      0 0.0.0.0:80              0.0.0.0:*               LISTEN      81215/nginx: master
9.關(guān)閉防火墻
systemctl stop firewalld
setenforce 0
[root@nginx nginx-1.12.2]# systemctl stop firewalld.service
[root@nginx nginx-1.12.2]# setenforce 1
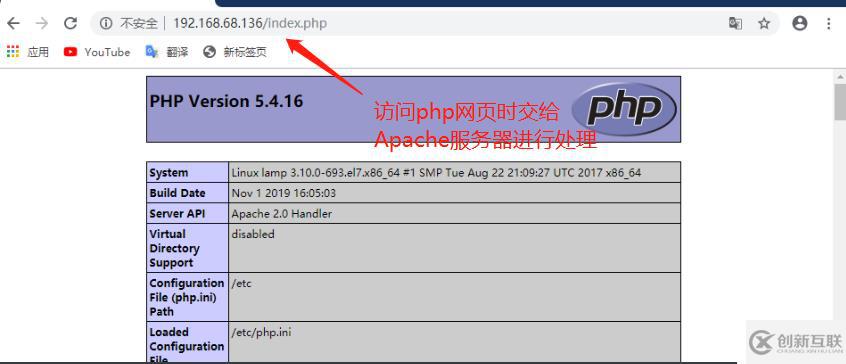
10.測試驗證是否通過nginx服務(wù)器訪問php網(wǎng)頁
到此,相信大家對“Nginx+Apache動靜分離部署過程”有了更深的了解,不妨來實(shí)際操作一番吧!這里是創(chuàng)新互聯(lián)網(wǎng)站,更多相關(guān)內(nèi)容可以進(jìn)入相關(guān)頻道進(jìn)行查詢,關(guān)注我們,繼續(xù)學(xué)習(xí)!
當(dāng)前題目:Nginx+Apache動靜分離部署過程
網(wǎng)頁鏈接:http://chinadenli.net/article0/gieioo.html
成都網(wǎng)站建設(shè)公司_創(chuàng)新互聯(lián),為您提供網(wǎng)站內(nèi)鏈、靜態(tài)網(wǎng)站、響應(yīng)式網(wǎng)站、標(biāo)簽優(yōu)化、自適應(yīng)網(wǎng)站、面包屑導(dǎo)航
聲明:本網(wǎng)站發(fā)布的內(nèi)容(圖片、視頻和文字)以用戶投稿、用戶轉(zhuǎn)載內(nèi)容為主,如果涉及侵權(quán)請盡快告知,我們將會在第一時間刪除。文章觀點(diǎn)不代表本網(wǎng)站立場,如需處理請聯(lián)系客服。電話:028-86922220;郵箱:631063699@qq.com。內(nèi)容未經(jīng)允許不得轉(zhuǎn)載,或轉(zhuǎn)載時需注明來源: 創(chuàng)新互聯(lián)

- 濰坊網(wǎng)站建設(shè)seo優(yōu)化站長分享如何通過網(wǎng)頁站內(nèi)優(yōu)化能力實(shí)現(xiàn)首頁排名的晉升 2023-01-14
- 標(biāo)題黨是怎么煉成的?-大連網(wǎng)站建設(shè)分享 2022-08-03
- 成都網(wǎng)站建設(shè)的流程方法! 2013-08-31
- 四川網(wǎng)站建設(shè)公司如何讓網(wǎng)站更具特色 2022-08-10
- 景區(qū)網(wǎng)站建設(shè)方案應(yīng)該遵循的原則 2022-01-26
- 網(wǎng)站建設(shè)想要提升網(wǎng)站權(quán)重都需要做哪些? 2021-05-31
- 網(wǎng)站建設(shè)優(yōu)化要避免的三個誤區(qū) 2021-07-27
- 公司企業(yè)做網(wǎng)站建設(shè)的目的 2013-07-22
- 為什么需要網(wǎng)站建設(shè)?網(wǎng)站建設(shè)的優(yōu)勢? 2022-08-08
- 論網(wǎng)站建設(shè)對一家企業(yè)的重要性 2017-07-30
- 營銷型網(wǎng)站建設(shè)必備功能 2022-12-30
- 日喀則網(wǎng)站建設(shè)為什么要使用DIV布局網(wǎng)站 2023-02-08