vue如何掛載路由到頭部導(dǎo)航-創(chuàng)新互聯(lián)
小編給大家分享一下vue如何掛載路由到頭部導(dǎo)航,相信大部分人都還不怎么了解,因此分享這篇文章給大家參考一下,希望大家閱讀完這篇文章后大有收獲,下面讓我們一起去了解一下吧!

路由是寫(xiě)好了,但正確的切換路由方式不應(yīng)該是我們?cè)诘刂窓诶锩孑斎氲刂罚凶非蟮姆绞绞屈c(diǎn)擊頭部的導(dǎo)航菜單來(lái)切換,就像這樣
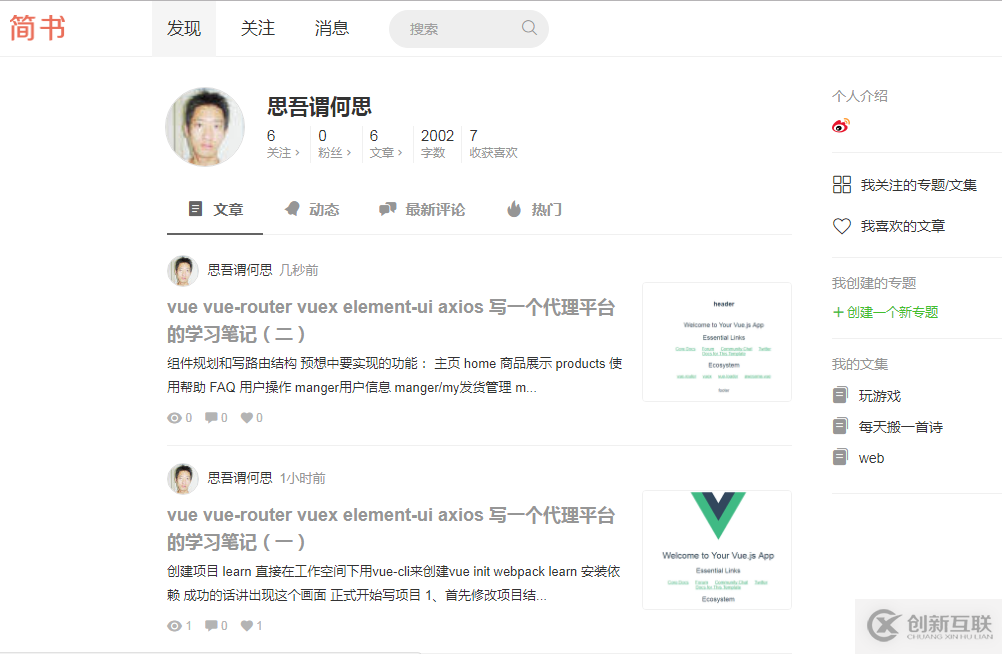
我們點(diǎn)擊上面的發(fā)現(xiàn)、關(guān)注、消息就切換路由導(dǎo)航
我們先把頭部的導(dǎo)航寫(xiě)好
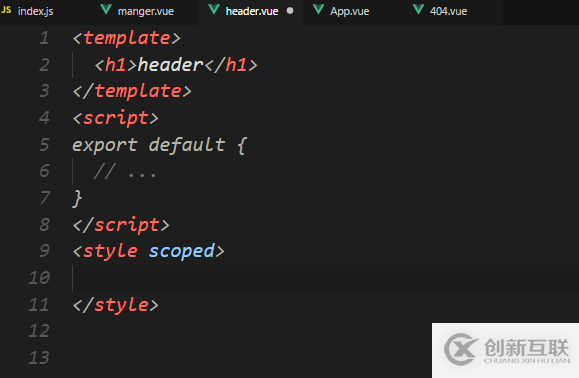
打開(kāi)header.vue
先把vue組件的基本格式寫(xiě)好
然后開(kāi)始布局寫(xiě)頭部
這里很不好意思,我一直以為頭部的header.vue是引入了的,實(shí)際上并沒(méi)有........
打開(kāi)app,vue重新編寫(xiě)一下
app.vue 代碼:
<template>
 <div id="app">
  <!-- element-ui 容器布局 -->
  <el-container>
   <!-- 頭部 -->
   <el-header>
    <!-- 頭部組件渲染 -->
    <header-ly></header-ly>
   </el-header>

   <!-- 中間主要區(qū)域容器 -->
   <el-container>
    <!-- 添加一個(gè)element-ui內(nèi)置的過(guò)渡動(dòng)畫(huà) -->
    <transition name="el-zoom-in-center">
     <!-- 通過(guò)路由渲染不同內(nèi)容的頁(yè)面 -->
     <router-view/>
    </transition>
   </el-container>

   <!-- 底部 -->
   <el-footer>
    <!-- 底部組件渲染 -->
    <footer-ly></footer-ly>
   </el-footer>

  </el-container>
 </div>
</template>

<script>
// 導(dǎo)入組件
import HeaderLy from '@/components/header'
import FooterLy from '@/components/footer'
export default {
 name: 'app',
 components: {
  HeaderLy,
  FooterLy
 }
}
</script>

<style>
#app {
 font-family: 'Avenir', Helvetica, Arial, sans-serif;
 -webkit-font-smoothing: antialiased;
 -moz-osx-font-smoothing: grayscale;
 text-align: center;
 color: #2c3e50;
}
</style>
編寫(xiě)頭部header.vue,這里的代碼基本上可以從element-ui官網(wǎng)上直接copy,地址:http://element-cn.eleme.io/#/zh-CN/
<template>
 <el-row>
  <!-- 左邊logo -->
  <el-col :span="4" class="logo">
   <img src="../assets/logo.png" >
  </el-col>
  <!-- 中間導(dǎo)航區(qū)域 -->
  <el-col :span="16">
   <el-menu
    :default-active="activeIndex2"
    class="menu"
    router
    mode="horizontal"
    @select="handleSelect"
    background-color="#545c64"
    text-color="#fff"
    active-text-color="#ffd04b">
    <el-menu-item index="1">處理中心</el-menu-item>
    <el-submenu index="2">
     <template slot="title">我的工作臺(tái)</template>
     <el-menu-item index="2-1">選項(xiàng)1</el-menu-item>
     <el-menu-item index="2-2">選項(xiàng)2</el-menu-item>
     <el-menu-item index="2-3">選項(xiàng)3</el-menu-item>
    </el-submenu>
    <el-menu-item index="3"><a href="https://www.ele.me" rel="external nofollow" target="_blank">訂單管理</a></el-menu-item>
   </el-menu>
  </el-col>
  <!-- 右邊用戶(hù)信息以及登陸注冊(cè) -->
  <el-button-group>
   <el-button type="danger" size="small" round >login</el-button>
   <el-button type="success" size="small" round >regin</el-button>
  </el-button-group>
 </el-row>
</template>
<script>
export default {
 // ...
}
</script>
<style scoped>

</style>
這個(gè)時(shí)候?yàn)g覽器中是這樣的
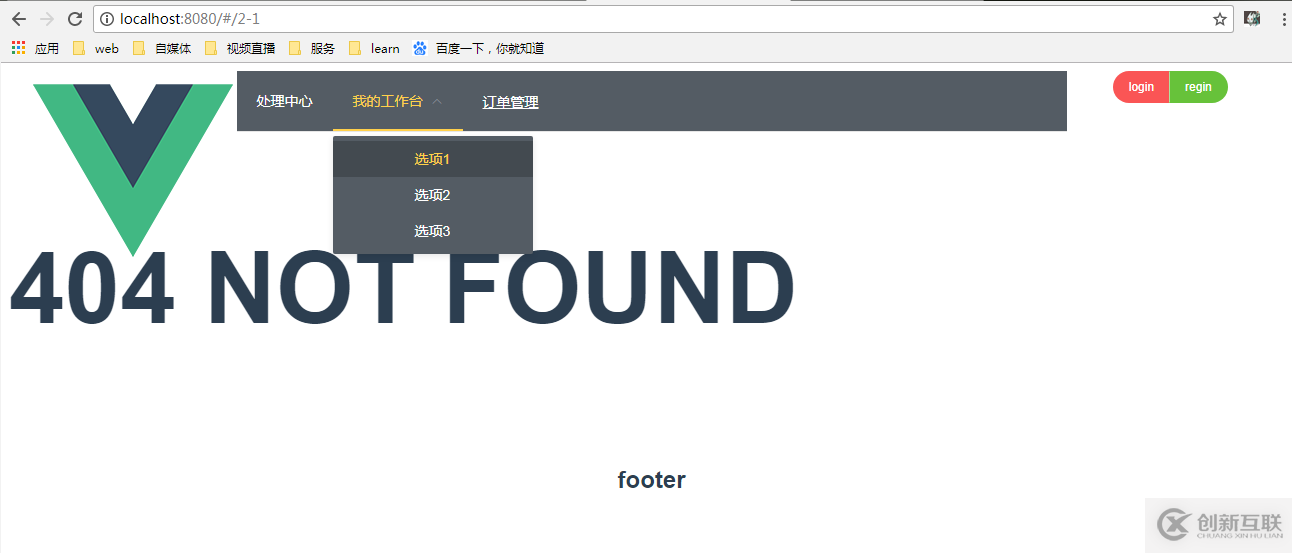
樣子很丑,但這不是重點(diǎn),我們點(diǎn)擊導(dǎo)航的時(shí)候,他直接跳到的是<el-menu-item index="2-1">xxxxxx<el-menu-item>,這里面的index,所以最笨的辦法就是改index的值就行了,但這樣就不夠靈活了....
一般寫(xiě)導(dǎo)航的辦法是這樣的
<template>
<el-row>
<!-- 左邊logo -->
<el-col :span="4" class="logo">
<img src="../assets/logo.png" >
</el-col>
<!-- 中間導(dǎo)航區(qū)域 -->
<el-col :span="16">
<el-menu
:default-active="$route.path"
class="menu"
router
mode="horizontal"
@select="handleSelect"
background-color="#545c64"
text-color="#fff"
active-text-color="#ffd04b">
<!-- 循環(huán)寫(xiě)的路由,其中路由中有 hidden:true 的就不加入循環(huán) -->
<template
v-for="route in $router.options.routes"
v-if="!route.hidden">
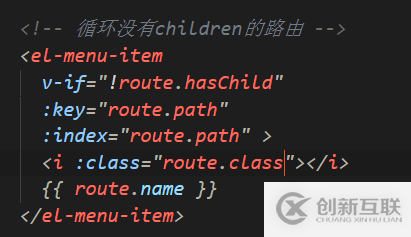
<!-- 循環(huán)沒(méi)有children的路由 -->
<el-menu-item
v-if="!route.hasChild"
:key="route.path"
:index="route.path" >
{{ route.name }}
</el-menu-item>
<!-- 循環(huán)有children的路由 -->
<el-submenu v-else :index="route.path">
<template slot="title">{{ route.name }}</template>
<el-menu-item
v-for="child in route.children"
:index="child.path"
:key="child.path">
{{ child.name }}
</el-menu-item>
</el-submenu>
</template>
</el-menu>
</el-col>
<!-- 右邊用戶(hù)信息以及登陸注冊(cè) -->
<el-button-group>
<el-button type="danger" size="small" round >login</el-button>
<el-button type="success" size="small" round >regin</el-button>
</el-button-group>
</el-row>
</template>
<script>
export default {
// ...
methods: {
handleSelect () {
console.log('菜單選擇之后的回調(diào)操作')
}
}
}
</script>
<style scoped>
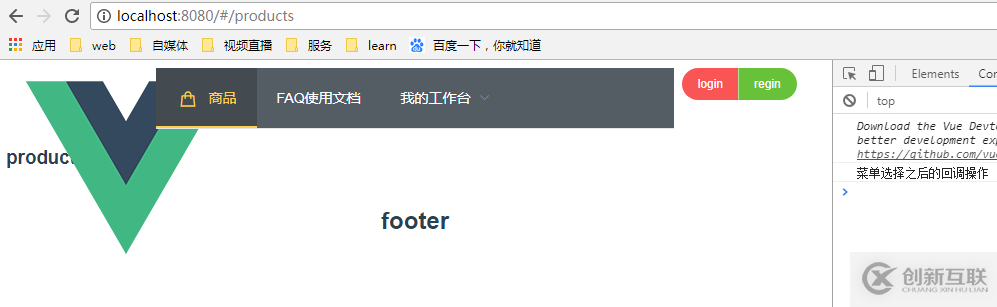
</style>這樣在瀏覽器中的效果
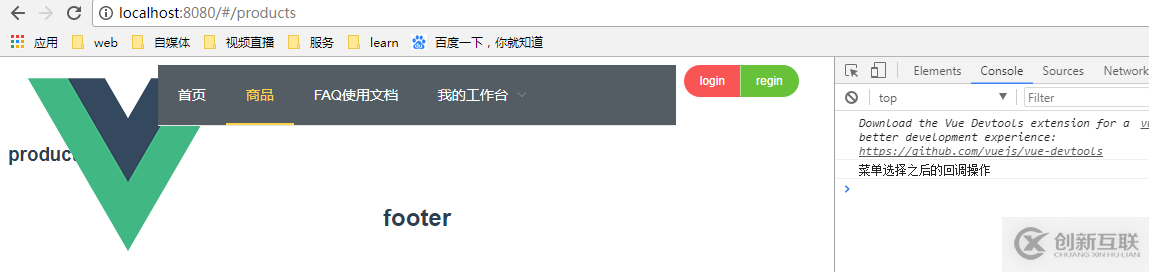
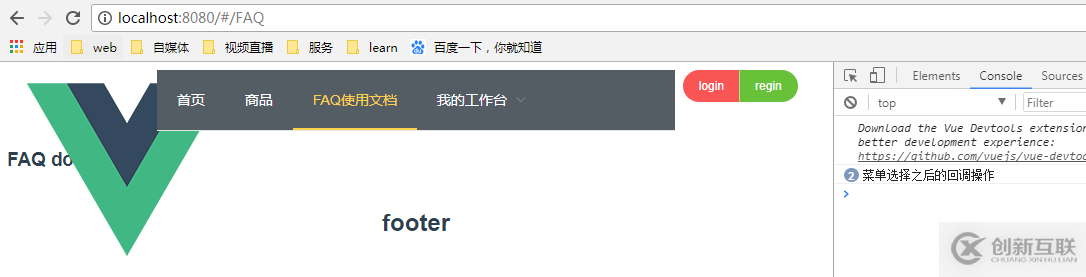
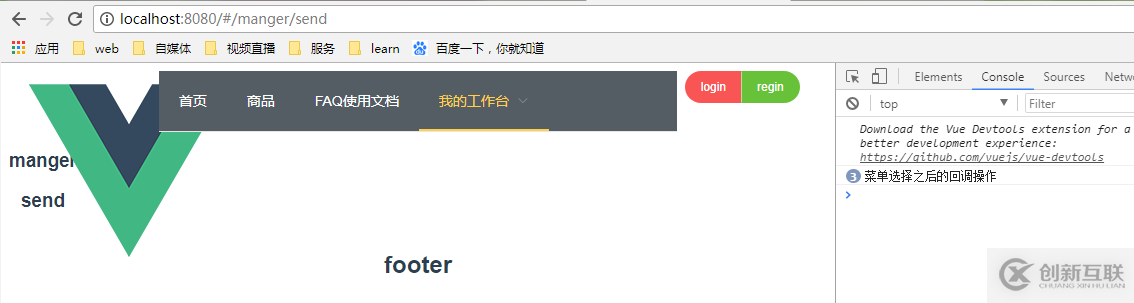
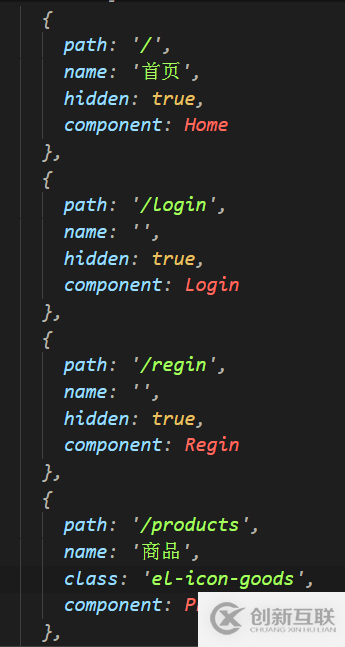
這樣點(diǎn)擊導(dǎo)航菜單之后的跳轉(zhuǎn)就完全正常了,這樣寫(xiě)的好處就是很靈活,如果要加icon圖標(biāo)的話(huà),也可以直接在router/index.js里面的配置路由部分加個(gè)字段class:classname,然后在循環(huán)的時(shí)候輸出就可以了。當(dāng)然這里一般是不把首頁(yè)這個(gè)導(dǎo)航菜單顯示出來(lái)的,我們可以直接在路由配置中加個(gè)hidden:true 就實(shí)現(xiàn)了
就像這樣
效果
只需要簡(jiǎn)單的修改就可以完成了
這樣在導(dǎo)航上掛路由就完成了,接下來(lái)寫(xiě)寫(xiě)樣式,完善一下功能header.vue就差不多完成了
以上是“vue如何掛載路由到頭部導(dǎo)航”這篇文章的所有內(nèi)容,感謝各位的閱讀!相信大家都有了一定的了解,希望分享的內(nèi)容對(duì)大家有所幫助,如果還想學(xué)習(xí)更多知識(shí),歡迎關(guān)注創(chuàng)新互聯(lián)成都網(wǎng)站設(shè)計(jì)公司行業(yè)資訊頻道!
另外有需要云服務(wù)器可以了解下創(chuàng)新互聯(lián)scvps.cn,海內(nèi)外云服務(wù)器15元起步,三天無(wú)理由+7*72小時(shí)售后在線(xiàn),公司持有idc許可證,提供“云服務(wù)器、裸金屬服務(wù)器、高防服務(wù)器、香港服務(wù)器、美國(guó)服務(wù)器、虛擬主機(jī)、免備案服務(wù)器”等云主機(jī)租用服務(wù)以及企業(yè)上云的綜合解決方案,具有“安全穩(wěn)定、簡(jiǎn)單易用、服務(wù)可用性高、性?xún)r(jià)比高”等特點(diǎn)與優(yōu)勢(shì),專(zhuān)為企業(yè)上云打造定制,能夠滿(mǎn)足用戶(hù)豐富、多元化的應(yīng)用場(chǎng)景需求。
新聞名稱(chēng):vue如何掛載路由到頭部導(dǎo)航-創(chuàng)新互聯(lián)
本文地址:http://chinadenli.net/article0/dghsoo.html
成都網(wǎng)站建設(shè)公司_創(chuàng)新互聯(lián),為您提供網(wǎng)站建設(shè)、動(dòng)態(tài)網(wǎng)站、全網(wǎng)營(yíng)銷(xiāo)推廣、網(wǎng)站內(nèi)鏈、外貿(mào)網(wǎng)站建設(shè)、響應(yīng)式網(wǎng)站
聲明:本網(wǎng)站發(fā)布的內(nèi)容(圖片、視頻和文字)以用戶(hù)投稿、用戶(hù)轉(zhuǎn)載內(nèi)容為主,如果涉及侵權(quán)請(qǐng)盡快告知,我們將會(huì)在第一時(shí)間刪除。文章觀點(diǎn)不代表本網(wǎng)站立場(chǎng),如需處理請(qǐng)聯(lián)系客服。電話(huà):028-86922220;郵箱:631063699@qq.com。內(nèi)容未經(jīng)允許不得轉(zhuǎn)載,或轉(zhuǎn)載時(shí)需注明來(lái)源: 創(chuàng)新互聯(lián)
猜你還喜歡下面的內(nèi)容
- python使用python-pptx刪除ppt某頁(yè)實(shí)例-創(chuàng)新互聯(lián)
- 使用SoapUI測(cè)試webservice接口詳細(xì)步驟-創(chuàng)新互聯(lián)
- Pythonqueue隊(duì)列原理與應(yīng)用案例分析-創(chuàng)新互聯(lián)
- Webpack實(shí)現(xiàn)按需打包Lodash的幾種方法詳解-創(chuàng)新互聯(lián)
- 在HTML中插入一行橫線(xiàn)的方法-創(chuàng)新互聯(lián)
- Python雙鏈表原理與實(shí)現(xiàn)方法詳解-創(chuàng)新互聯(lián)
- Python代碼注釋規(guī)范代碼的案例分析-創(chuàng)新互聯(lián)

- 2015,商城網(wǎng)站運(yùn)營(yíng)幾個(gè)值得注意的新方向 2015-07-12
- 網(wǎng)上商城網(wǎng)站建設(shè)開(kāi)發(fā)公司及建設(shè)方案 2023-01-21
- 微信小程序商城功能大全及用戶(hù)量裂變方法!! 2017-04-16
- 淘寶搜索“你絕對(duì)不想知道的事”,以此來(lái)看商城網(wǎng)站制作思路 2013-04-26
- 企業(yè)商城網(wǎng)站建設(shè)應(yīng)該注意哪些方面? 2016-11-08
- 電子商城網(wǎng)站面包屑導(dǎo)航制作要避免哪些雷區(qū)? 2014-07-31
- 商城網(wǎng)站建設(shè)想要有流量需要哪些條件 2022-10-14
- 廣州商城網(wǎng)站建設(shè)有哪些優(yōu)勢(shì)? 2022-12-07
- 電子商城網(wǎng)站建設(shè)效果不理想的原因是什么 2021-04-23
- 企業(yè)建立獨(dú)立商城網(wǎng)站需要哪些費(fèi)用 2023-02-03
- 商城網(wǎng)站建設(shè)有哪些需要注意的方面 2016-10-31
- 小程序和微商城的區(qū)別在哪里? 2016-08-26